June 25, 2026•11 min read
How to Fix AI Skin Texture (Make AI Model Skin Look Real) in 2026
AI fashion models often come out with plastic, waxy, over-smoothed skin. Here is why it happens and a 7-step fix, with the prompt words, negative prompts, lighting, and resolution settings that make AI model skin look real.
Picture of How to Fix AI Skin Texture (Make AI Model Skin Look Real) in 2026 article
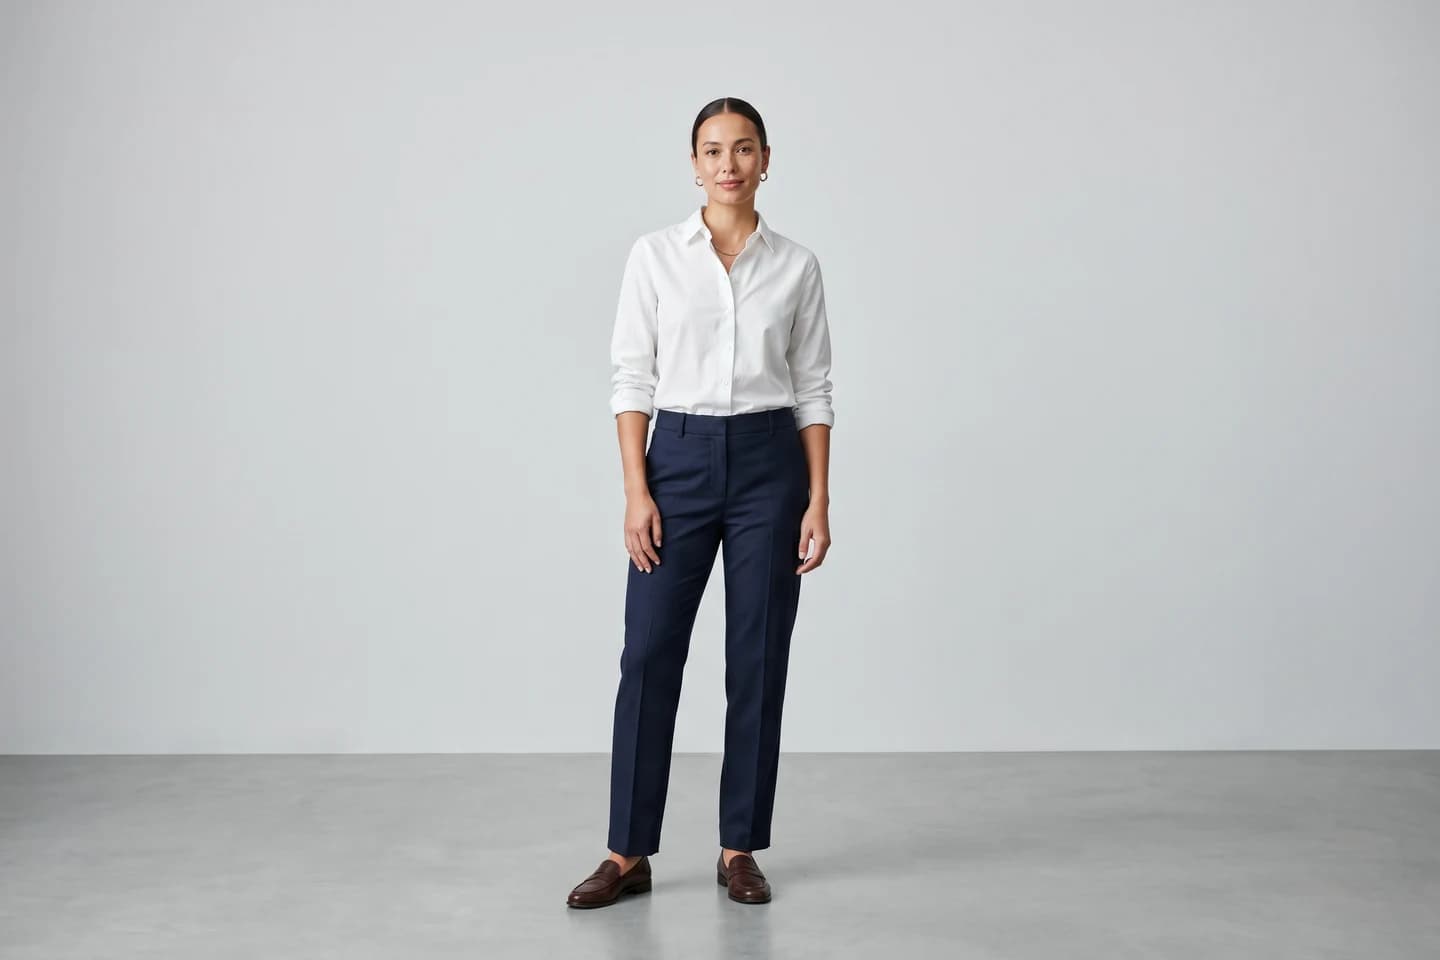
You generated a great AI fashion model: right pose, right outfit, right background. Then you zoom in and the face looks like a mannequin dipped in wax. The skin is too smooth, the highlights are too even, and the whole shot tips into the uncanny valley. If you want to fix AI skin texture so your model photos read as real photography, the problem is almost always solvable at the prompt and settings level, not just in post.
Plastic skin happens because most image models are trained on heavily retouched, beauty-filtered photos, so "smooth" becomes the default. Real skin has pores, fine lines, and color shifts that scatter light unevenly, and AI tends to erase exactly those details. This guide walks through why it happens and the concrete steps, prompt phrasing, and output settings that bring back natural skin texture on AI fashion models.
This is a hands-on fix guide. Every step works whether you are generating models from scratch or running a product shot through an AI fashion model generator.
Why AI model skin looks plastic or waxy
Before fixing it, it helps to know what causes the plastic look. Four things drive it, and most bad skin is a mix of all four.
- Beauty-filter training data. Models learn from millions of retouched, airbrushed portraits, so they treat poreless, even-toned skin as "correct." That bias shows up as a default smooth finish.
- Over-smoothing of micro-detail. Real skin has pores, peach fuzz, and tiny shadows. When the model averages those out, the surface becomes uniform.
- Flat, even lighting response. Pores and surface texture make skin reflect light unevenly. Strip the texture and light spreads flat across the face, which reads as synthetic.
- Aggressive upscalers and enhancers. Many "enhance" passes are really just denoise and smooth, so they make the problem worse, sanding off whatever real texture survived generation.
The fix is to counter each of these directly: tell the model to keep texture, light the face to reveal it, render at high enough resolution to hold it, and avoid post steps that wipe it out.


Create your own AI fashion models
Generate diverse, brand-consistent models from a simple prompt and reuse them across every campaign.
How to fix AI skin texture: 7 steps
Work through these in order. The first three steps fix most cases; the rest are for when you need the skin to hold up under a close crop.
Step 1: Add explicit skin-texture words to your prompt
The single biggest lever is telling the model what real skin looks like. Generic prompts like "beautiful woman, fashion photo" default to smooth skin. Add concrete texture terms instead. Effective phrasing to include:
visible skin poresnatural skin texturefine lines and subtle imperfectionsslight skin shine, not mattefrecklesorlight blemisheswhere appropriatenatural color variation across the face
A practical prompt fragment for a fashion portrait: "editorial fashion photo, natural skin texture with visible pores, subtle fine lines, realistic uneven skin tone, soft sidelight, shot on 85mm lens." The point is to describe a real photograph, not a beauty render. Good prompt engineering for skin is mostly about naming the imperfections you want to keep.
Step 2: Remove the words that erase texture
Just as important as what you add is what you remove. Certain words instruct the model to smooth and polish. Cut these from your prompts:
perfect skinflawlessairbrushedsmooth skinbeauty retouch/glamporcelain(unless you genuinely want a doll finish)
Replace "flawless beauty portrait" with "natural, realistic portrait." A single word like "flawless" can override every texture term you added, so audit the whole prompt, not just the skin section.
Step 3: Use a negative prompt to block smoothing
On models that support them, a negative prompt tells the generator what to keep out. This is your strongest anti-plastic tool. A reliable skin negative prompt:
smooth skin, plastic skin, waxy, airbrushed, over-smoothed, blurry skin, doll, cgi, 3d render, beauty filter
This works because it suppresses the exact artifacts that cause the waxy look. Pair it with the positive texture terms from Step 1 and you are pushing the model from both directions at once.
| Prompt element | Use it for | Avoid because |
|---|---|---|
visible pores, fine lines (positive) | Restoring micro-detail | n/a |
natural color variation (positive) | Killing flat, even skin tone | n/a |
flawless, airbrushed (positive) | n/a | Forces smoothing |
smooth skin, plastic, waxy (negative) | Blocking the plastic finish | n/a |
| Heavy AI "enhance" pass | n/a | Often re-smooths skin |
Step 4: Light the face to reveal texture
Flat, frontal lighting hides texture; directional light reveals it. Pores and fine lines only show when light skims across the surface and casts micro-shadows. In your prompt, specify lighting that creates angle:
soft directional sidelightorwindow light from the side45-degree key lightrim lightto separate the subject and add edge detail- avoid
flat lighting,ring light, andeven studio lightingwhen you want maximum texture
For fashion work, sidelight also makes fabric texture pop, so it improves the garment and the skin in one move.
Step 5: Render at 2K or 4K, not low resolution
Skin micro-detail simply does not fit in a small image. At low resolution there are not enough pixels to render pores, so the model fills the area with smooth color. Generate at the highest native resolution your tool offers, then keep that detail through export. WearView, for example, renders HD, 2K, and 4K output, and the higher tiers are where fine skin texture and fabric weave actually survive into the final file. If your tool tops out low, that ceiling alone can cause plastic skin no matter how good the prompt is.
Step 6: Be careful with upscalers and enhancers
A lot of "AI enhance" and one-click beautify passes are denoisers in disguise. They lift sharpness on edges but smooth flat areas like cheeks and foreheads, which destroys the texture you worked to create. If you upscale:
- Use a detail-preserving AI upscaling model, not a smoothing filter
- Keep the denoise / smoothing strength low
- Compare a 100% crop before and after; if the pores vanished, dial it back
When in doubt, a clean high-resolution generation beats a low-resolution one rescued by an aggressive upscaler.
Step 7: Fix texture in post when generation is close
If the image is 90% there, you can restore texture in editing rather than re-rolling. Two reliable techniques:
- Add a subtle noise/grain layer over the skin at low opacity to break up the uniform surface. This is the fastest fix for mild plastic skin.
- Skin-texture overlay or frequency separation in a photo editor to reintroduce pores from a real reference. This is closer to professional photo retouching in reverse: instead of removing flaws, you add believable ones back.
Use post as a finisher, not a crutch. If you are re-rolling the same shot more than a couple of times, the problem is in the prompt or the resolution, not the edit.

Turn flat-lays into on-model photos
Drop in a flat-lay or product shot and get professional on-model photography ready for your store.
A copy-paste prompt recipe for natural skin
Here is a reusable structure you can adapt for any AI fashion model. Fill in the brackets and keep the texture and lighting blocks.
Positive prompt: "Editorial fashion photograph of [model description], wearing [garment]. Natural skin texture with visible pores, subtle fine lines, realistic uneven skin tone, slight natural shine. Soft directional window light from the left, shallow depth of field, shot on 85mm lens, photorealistic, high detail."
Negative prompt: "smooth skin, plastic skin, waxy, airbrushed, flawless, over-smoothed, blurry skin, doll, 3d render, cgi, beauty filter, ring-light flat lighting."
A few notes on using it:
- Swap
85mm lensfor50mmfor a slightly wider, less compressed face - Add
frecklesorlight skin blemishesfor more realism on close crops - Keep the resolution high; this recipe still looks plastic at low res because the pores have nowhere to render
Keeping skin consistent across a catalog
Fixing texture on one image is one thing; keeping it steady across a whole catalog is a separate problem. The reliable fix is to lock one model identity and reuse it across every product shot, so the same realistic face and skin character carry through the whole catalog. A fashion-native AI model generator built for repeatable identity holds that consistency far better than re-prompting each image from scratch.
What this means for you
- Audit your prompt first. Remove "flawless" and "airbrushed," add "visible pores, natural skin texture," and pair it with a smoothing negative prompt before you change anything else.
- Light for texture. Use directional sidelight, not flat ring light, so pores and fine lines cast the micro-shadows that read as real skin.
- Generate high, enhance carefully. Render at 2K or 4K and avoid one-click enhancers that smooth flat areas. A clean high-res image beats a rescued low-res one.
- Use post as a finisher. A subtle grain layer fixes mild plastic skin in seconds when the generation is otherwise good.
- For catalogs, use a fashion-native tool. To keep realistic skin consistent across every product, generate with AI fashion models built for repeatable identity rather than re-prompting each shot. Start at WearView.
Sources: Magnific: How to fix plastic skin, VidHex: How to make AI skin look real, Upsampler: Make AI skin texture look real, Banana Prompts: Realistic skin texture close-up prompt, AI skin texture techniques (2026)
FAQ
Why does AI-generated skin look plastic or waxy? Most image models are trained on heavily retouched, beauty-filtered photos, so they default to smooth, poreless skin. They average out the pores, fine lines, and color variation that make real skin scatter light unevenly, which leaves a flat, synthetic surface. Low output resolution and aggressive enhancers make it worse.
What prompt makes AI skin look realistic? Describe a real photograph and name the texture you want to keep: "natural skin texture, visible pores, subtle fine lines, realistic uneven skin tone, soft directional light, shot on 85mm lens." Then remove words like "flawless," "airbrushed," and "smooth skin," which tell the model to erase texture.
What should I put in a negative prompt to fix skin texture? Use a negative prompt like "smooth skin, plastic skin, waxy, airbrushed, over-smoothed, blurry skin, doll, 3d render, beauty filter." This suppresses the exact artifacts that cause the plastic look and pairs well with positive texture terms.
Does resolution affect AI skin texture? Yes. Skin micro-detail needs enough pixels to render. At low resolution there is no room for pores, so the model fills the area with smooth color. Generating at 2K or 4K gives fine texture the space it needs to survive into the final image.
Do AI upscalers and enhancers fix or ruin skin texture? It depends on the tool. Detail-preserving upscalers can help, but many one-click enhancers are denoisers that smooth flat areas like cheeks and foreheads, destroying texture. Keep smoothing strength low and check a 100% crop before and after.
How do I keep skin realistic across a whole product catalog? Use a fashion-focused tool that maintains the same model identity across shots rather than re-prompting each image. WearView's consistent models hold one realistic face across an entire collection, so skin character stays steady from SKU to SKU instead of drifting between waxy and natural.
Can I add skin texture after generating the image? Yes. If the generation is close, add a subtle noise or grain layer over the skin at low opacity, or use a skin-texture overlay to reintroduce pores from a real reference. Treat this as a finishing step, not a substitute for a good prompt and high resolution.

WearView Team
WearView Content & Research Team
WearView Team is a group of fashion technology specialists focused on AI fashion models, virtual try-on, and AI product photography for e-commerce brands. We publish in-depth guides, case studies, and practical insights to help fashion businesses improve conversion rates and scale faster using AI.