May 17, 2026•11 min read
How to Create Professional Clothing Photos With AI Fashion Models
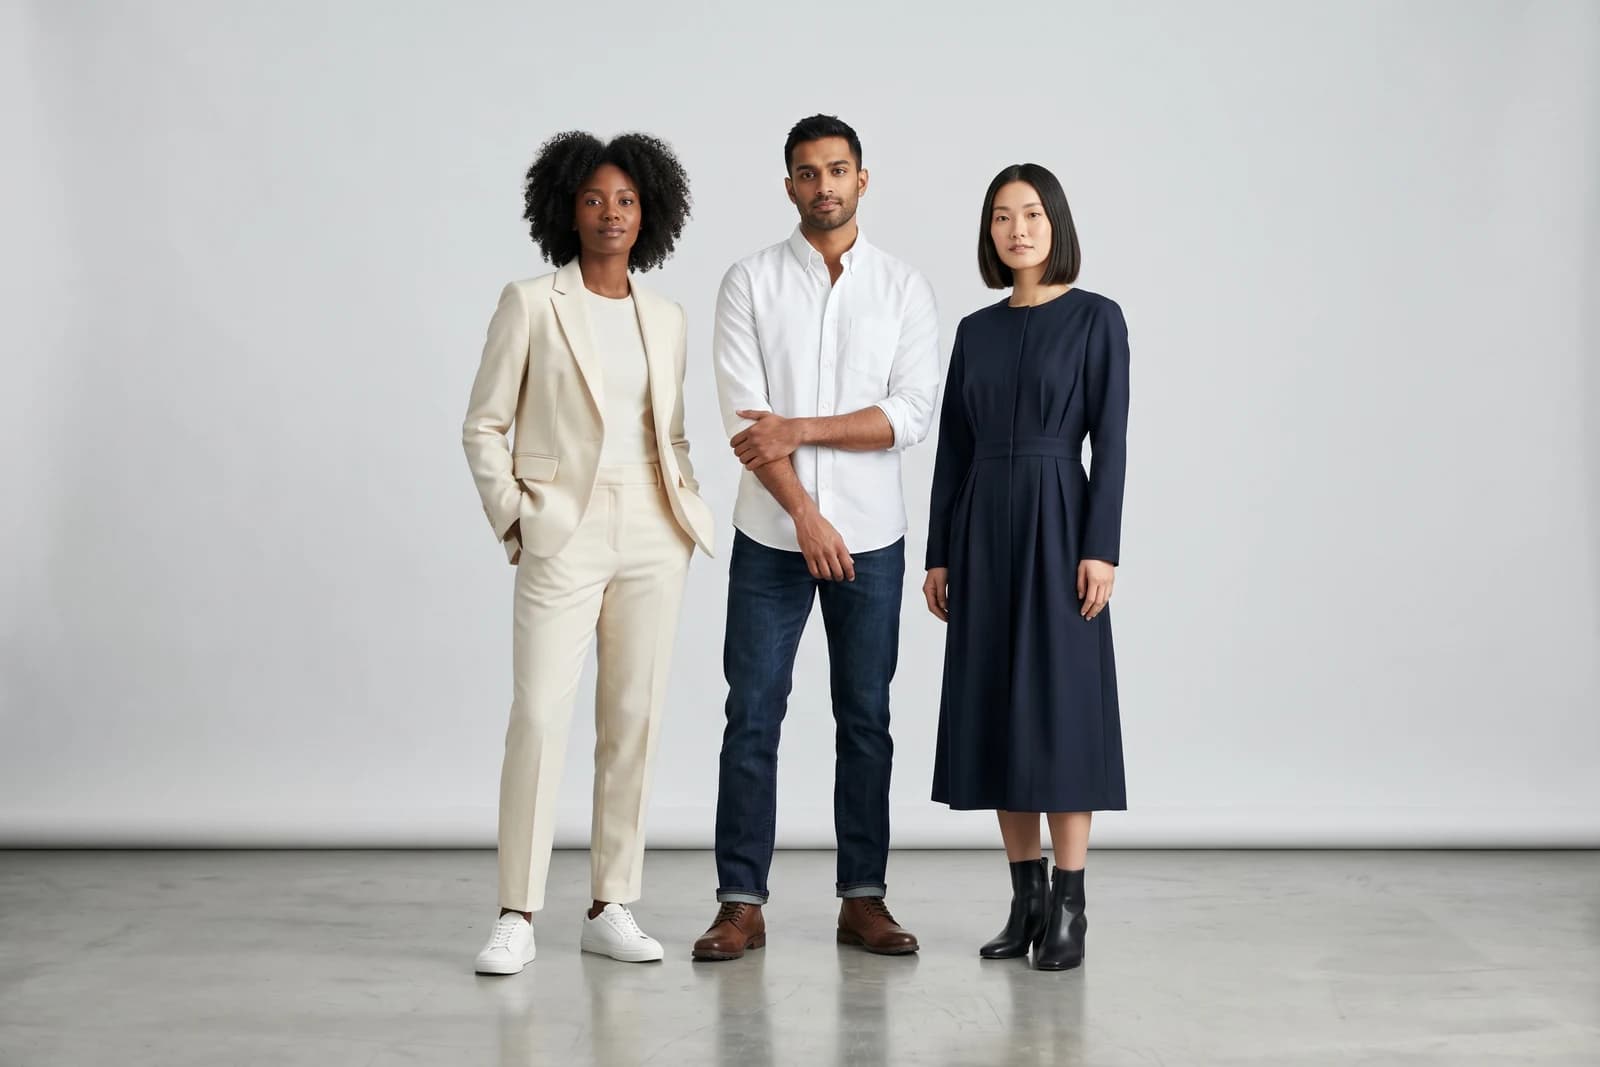
High-quality apparel photos used to mean a model, a photographer, a studio, and a week of editing. They don't anymore. This is a step-by-step walkthrough of how to turn a single garment image into campaign-ready on-model photos with AI fashion models, plus the upload habits and prompt tricks that actually change the output.
Picture of How to Create Professional Clothing Photos With AI Fashion Models article
High-quality apparel photos used to mean a booked model, a photographer, a studio day, and a week of retouching before anything went live. That math no longer holds. If you want to scale product imagery quickly and test ideas without burning a budget on every SKU, AI fashion models now cover most of what a standard catalog shoot used to.
The idea is simple: you give the tool a clean photo of your garment, it keeps the print, texture, and cut intact, and it fits that piece onto a realistic AI model in the pose and setting you want. WearView's virtual try-on and product to model tools do exactly this, with output up to 4K and full commercial rights on paid plans.
This post walks through the whole process step by step, then gets into the upload habits and prompt details that actually move the needle. None of it is complicated. Most of the quality difference comes down to what you feed the model, not how clever your prompt is.
Picture of How to Create Professional Clothing Photos With AI Fashion Models article
How to create professional fashion photos with AI models
Here is the full workflow, from a flat garment shot to a finished on-model image.
Step 1. Upload your garment
Start in the studio and upload the clothing item you want to feature. You have two sensible options:
- Upload a single item, then pair it with other pieces or describe the full look in a prompt
- Upload a matching set together (for example, a co-ord top and bottom)
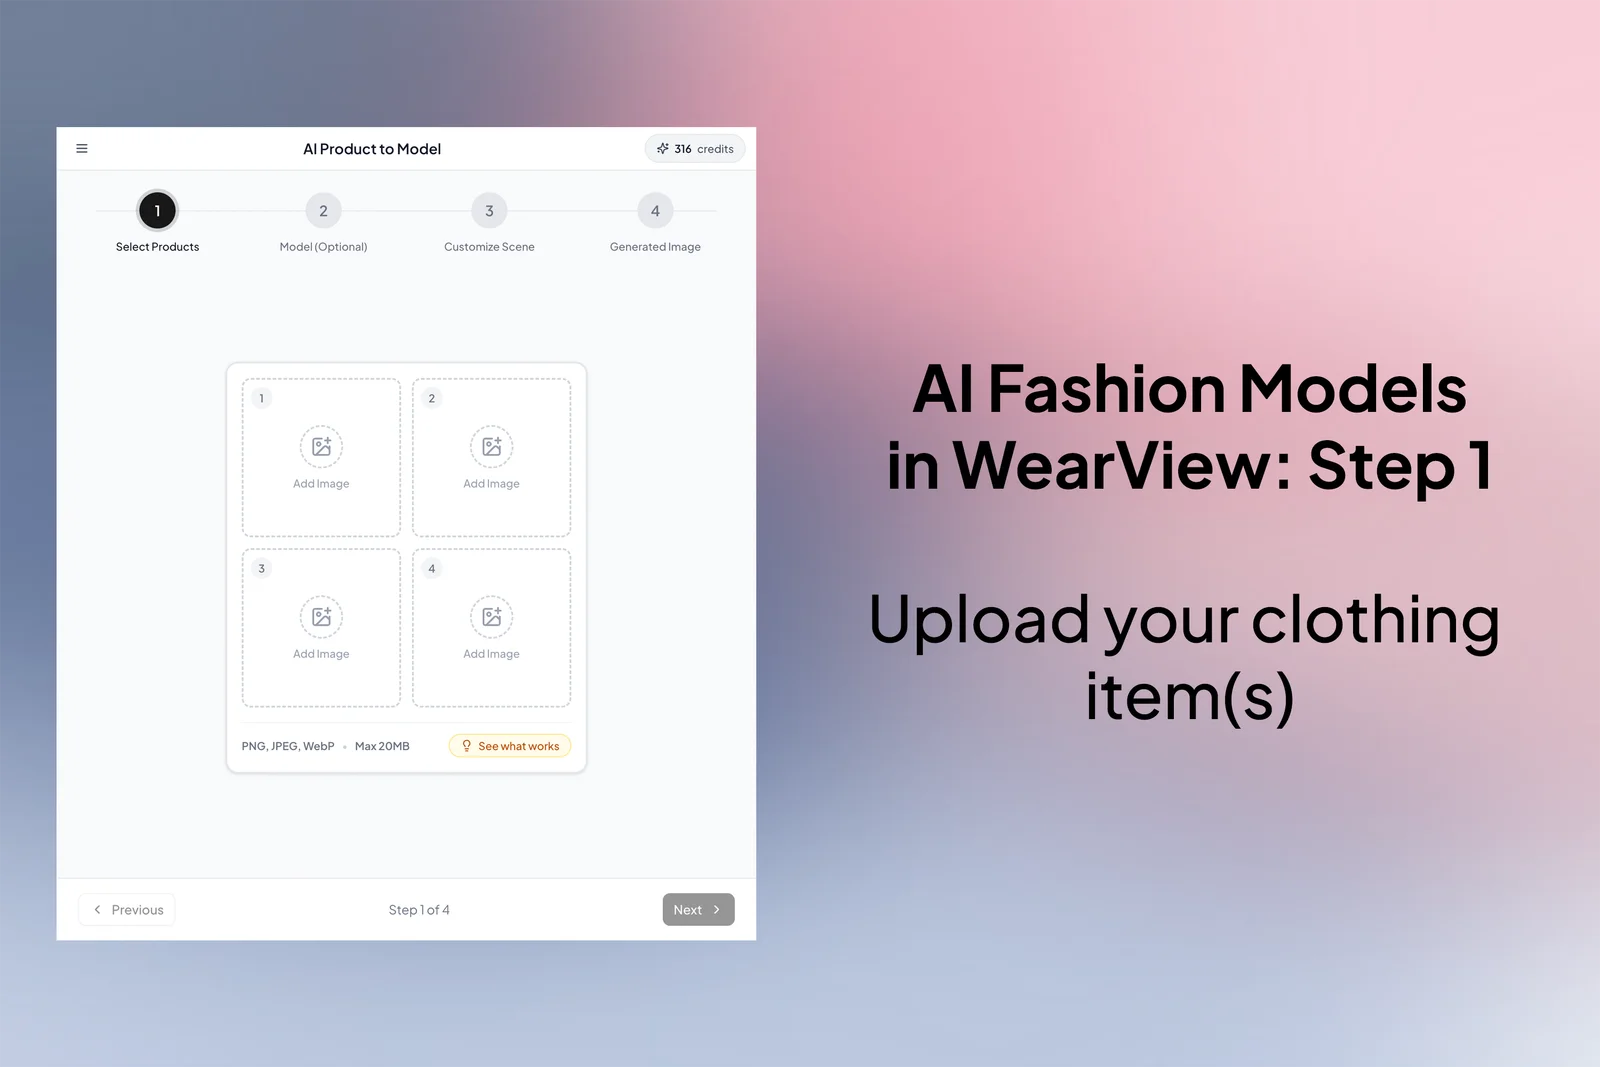
Uploading a clothing item to the AI fashion models generator
You can also upload more than one photo of the same item, a front and a back shot, so the AI understands the garment from both sides and fits it more naturally across different poses. This one habit alone fixes a lot of the "the back looks wrong" problems people run into.
A few upload rules that consistently produce better results:
- Use well-lit photos with a plain or transparent background
- Flatlay and ghost mannequin shots work best. If you don't have a clean ghost mannequin image yet, WearView can generate the ghost mannequin effect for you first
- Skip photos that include accessories or styling you don't actually want in the final shot
- Avoid cropped shots where part of the garment is cut off, since the AI can't guess a hemline it can't see
The pattern here is boring but true: the cleaner the input, the less the model has to invent, and the less it invents, the more the result looks like your actual product.
Step 2. Complete the outfit (optional)
If your main product needs a partner piece, a top that needs bottoms, or trousers that need something on top, you can add the complementary item. Upload your own, or describe it.
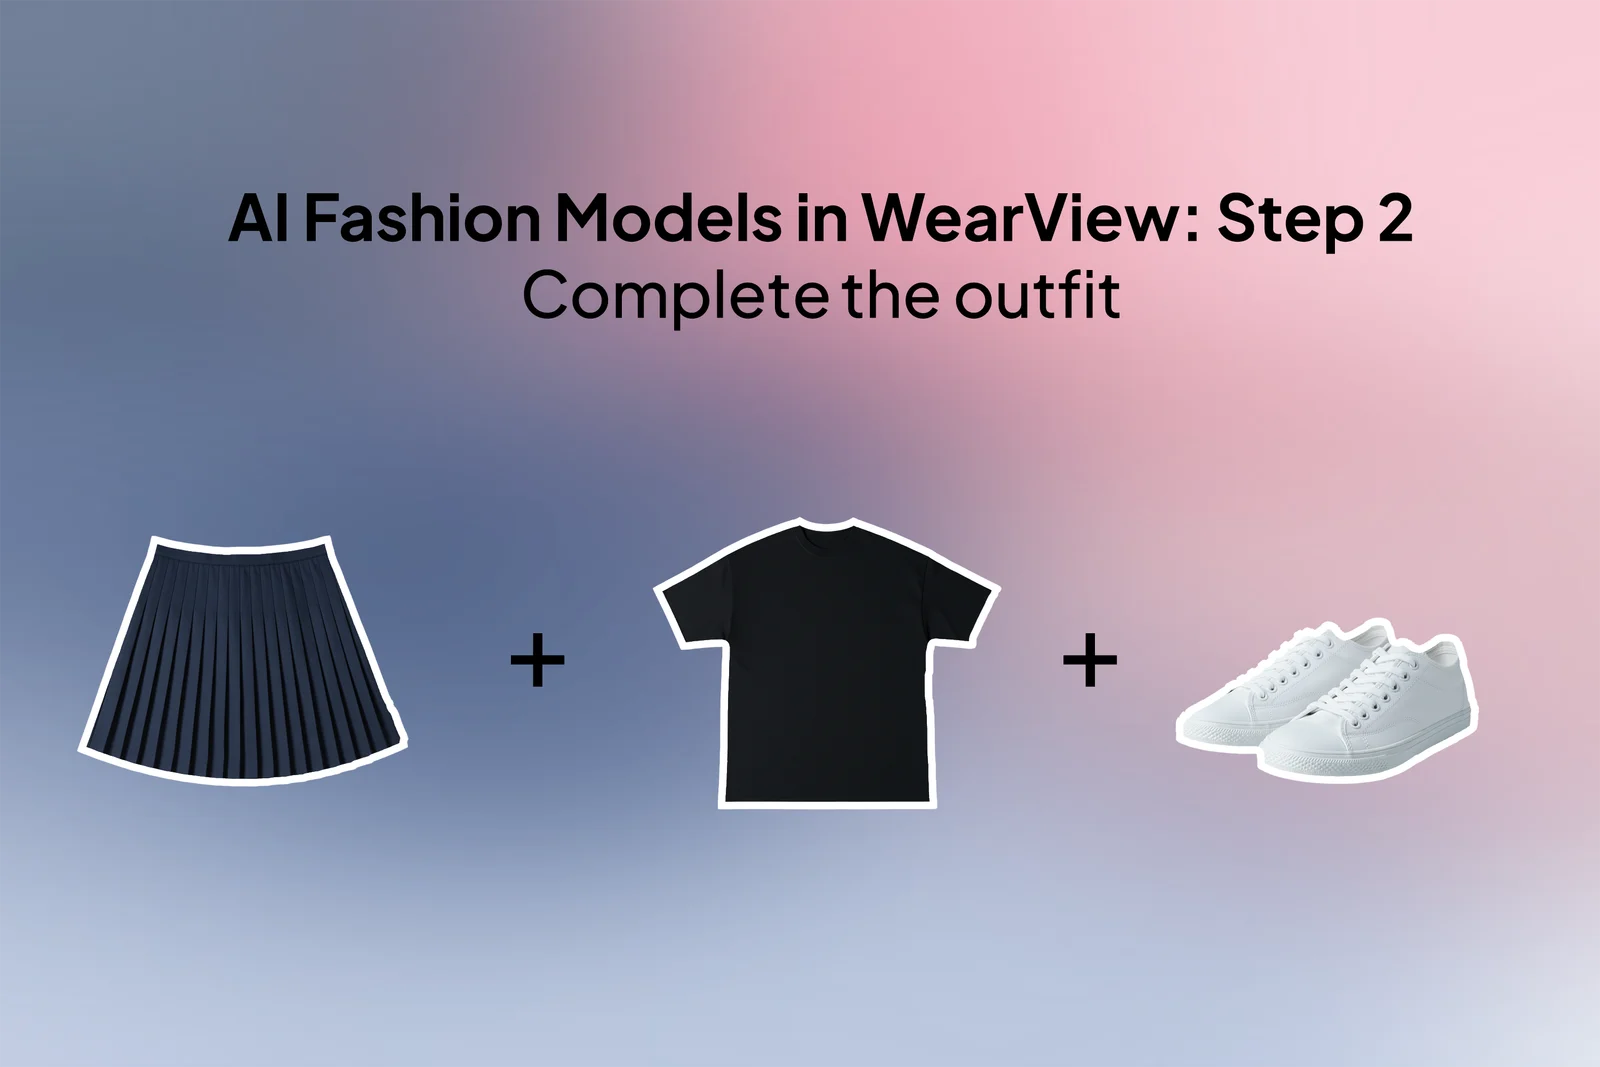
Completing the outfit with complementary items in the AI clothing model studio
Some guidance from getting this wrong a few times:
- Treat complementary pieces with the same care as the main item: clean image, no background clutter
- Don't pile on uploads. Too many garments at once confuses the model and it stops preserving every piece accurately
- Accessories are hit or miss. Hats and glasses can work. Fine jewelry and complex accessories usually don't, so leave those for a dedicated product shot
- Honestly, this step is optional. Often it is faster and cleaner to describe the styling in the prompt than to upload a second garment
One thing worth knowing: full-body fashion shots are generated with shoes by default. You can upload footwear as a complementary item or name the shoes in your prompt. For something like swimwear where you don't want shoes, say so explicitly in the prompt, otherwise the AI will add a matching pair on its own.
Step 3. Choose the model and pose
This is where AI fashion photography earns its keep. Instead of one booked model, you pick from a library of AI generated models across different ages, body types, and ethnicities, so the same jacket can be shown on the range of people who actually buy it.
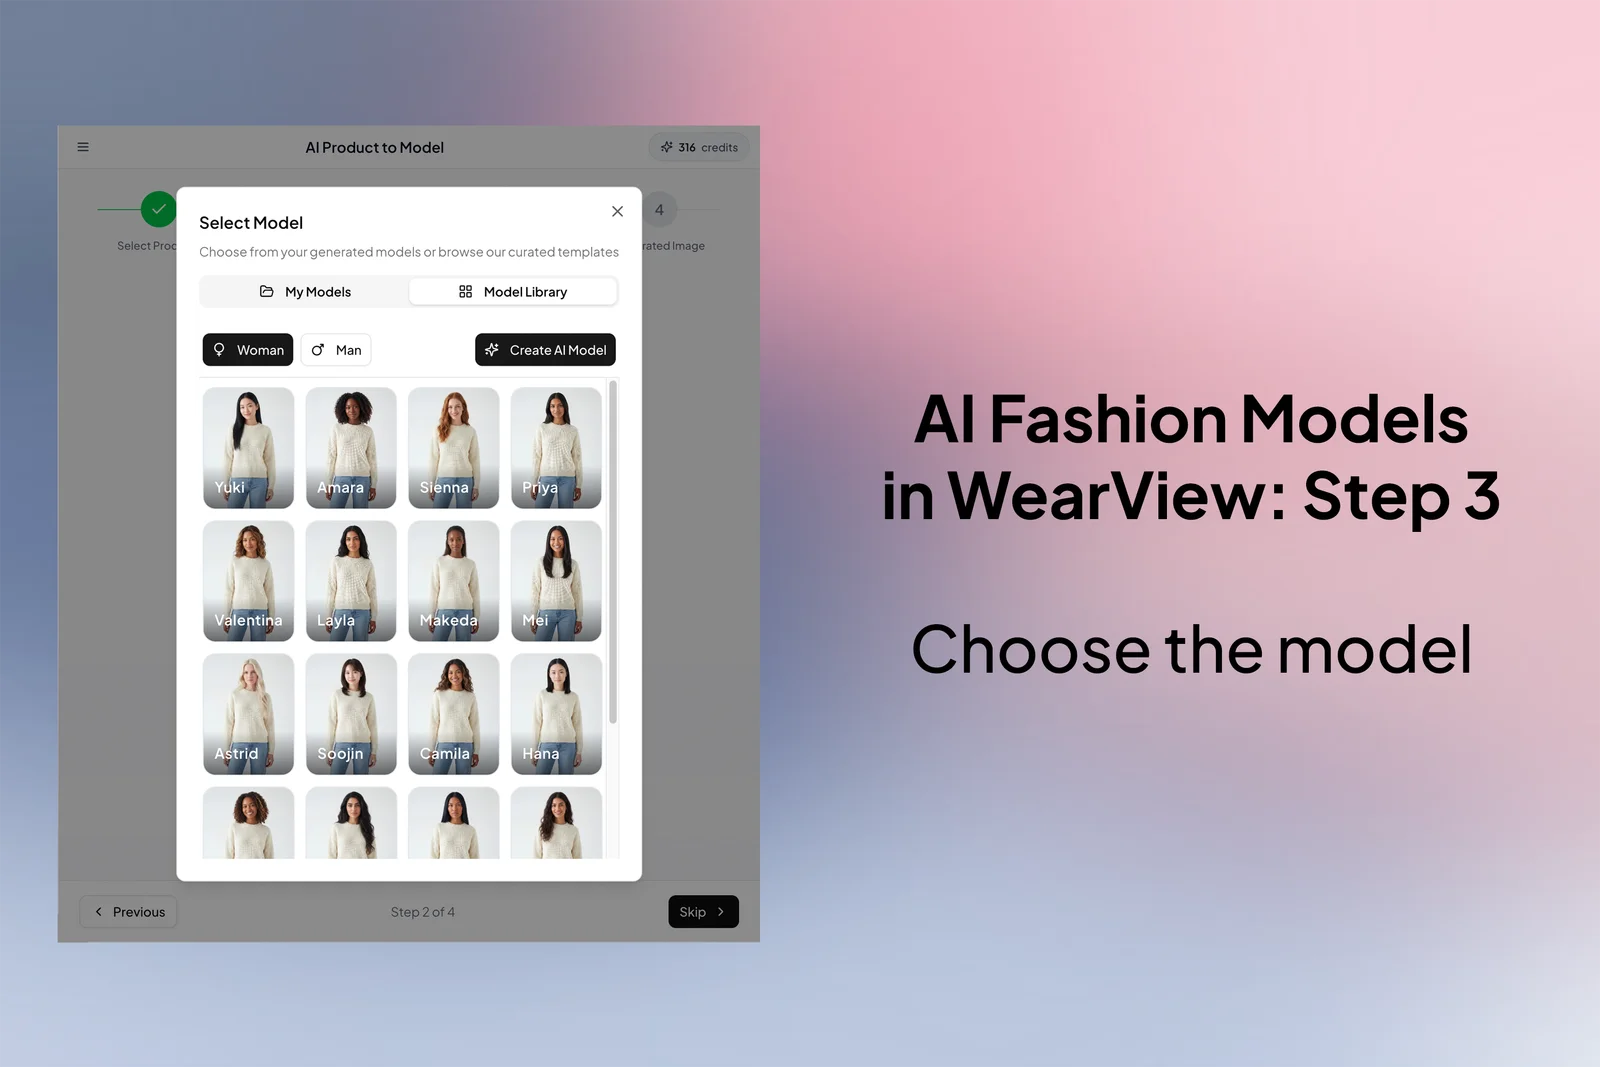
Choosing an AI fashion model and pose for an on-model clothing photo
Pick the model, then choose a pose. Preset poses cover the common catalog needs: a medium shot and several full-body angles. You are not limited to the presets. Describe any pose or action in the prompt and the model adjusts to it. If pose accuracy matters for your category, WearView also has dedicated pose control that follows a reference image closely.
If you want a specific face across an entire collection, this is the step that matters most. Reusing the same model keeps your product pages and campaigns visually coherent, which is the whole point of consistent AI models. It is the difference between a catalog that looks like one brand and one that looks like fifteen freelancers.
You can usually bring your own model too: a high-quality full-body reference, ideally shot in plain underwear or a bodysuit so the AI has a clean base to dress. Only do this with real people if you have the legal rights and proper consent. That part is not optional.
Step 4. Write a prompt (optional)
The last input is an optional text prompt that steers the scene and mood.
Skip it and you get a clean studio shot of your garment on the chosen model. That alone is enough to scale product detail pages with consistent, same-style studio images, which for a lot of stores is the entire job done.
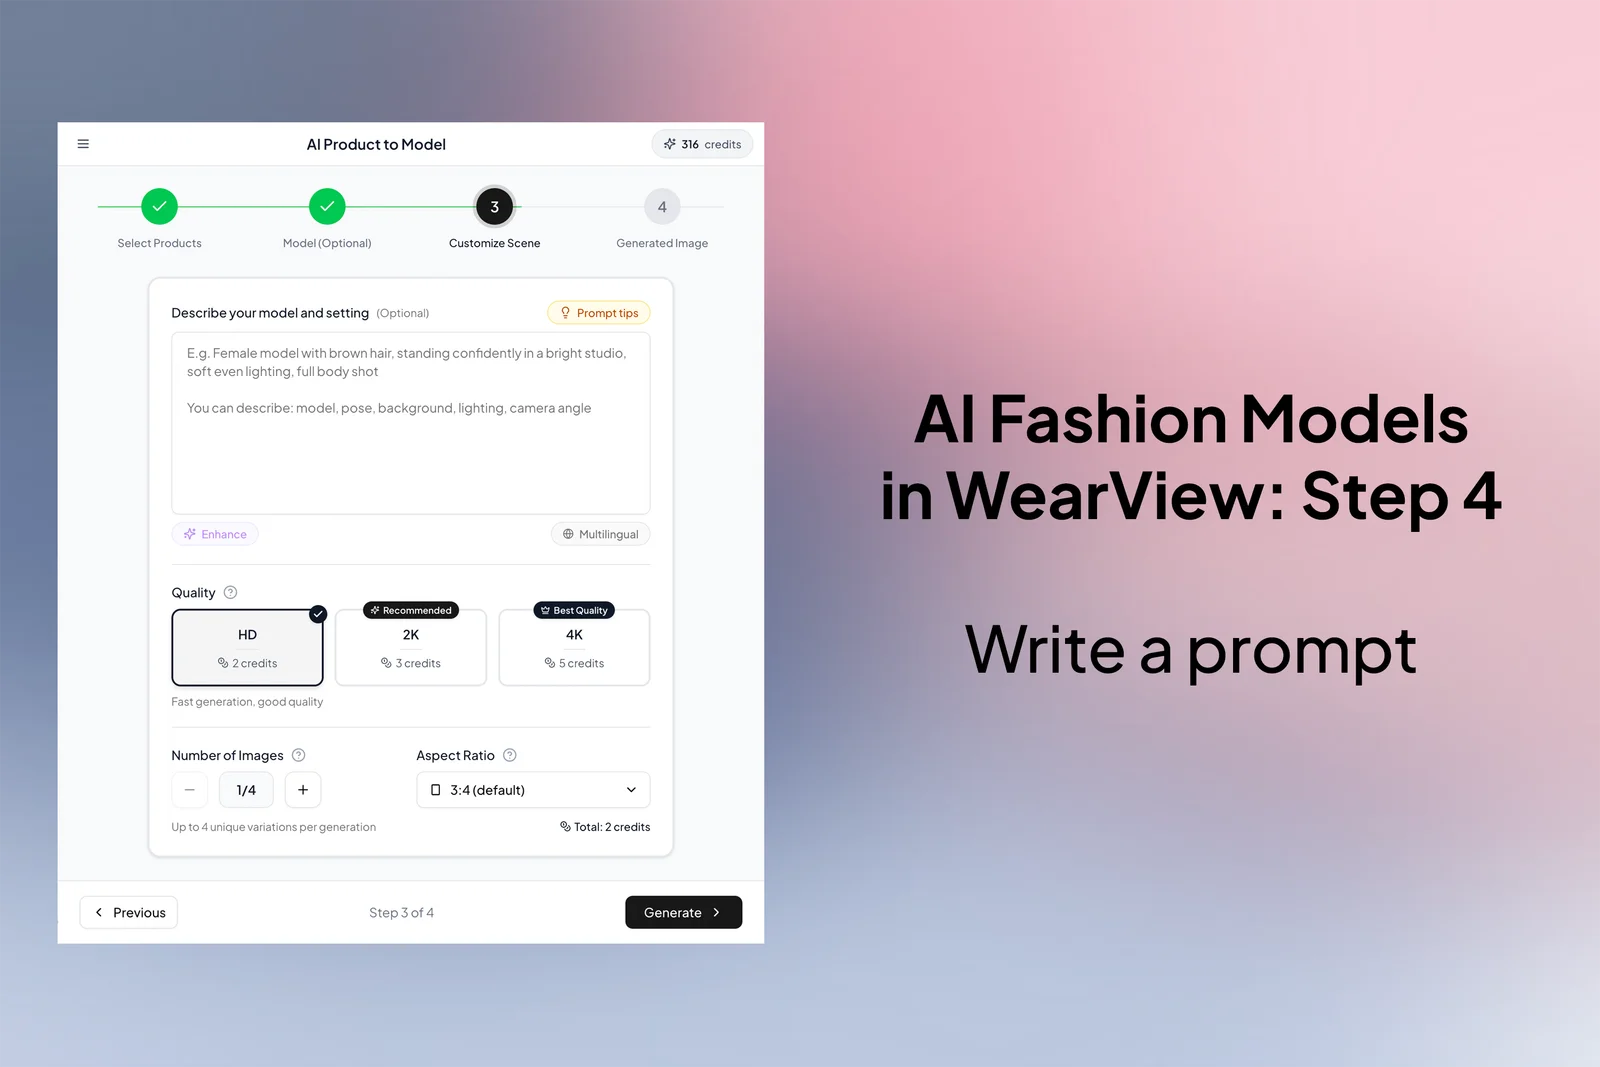
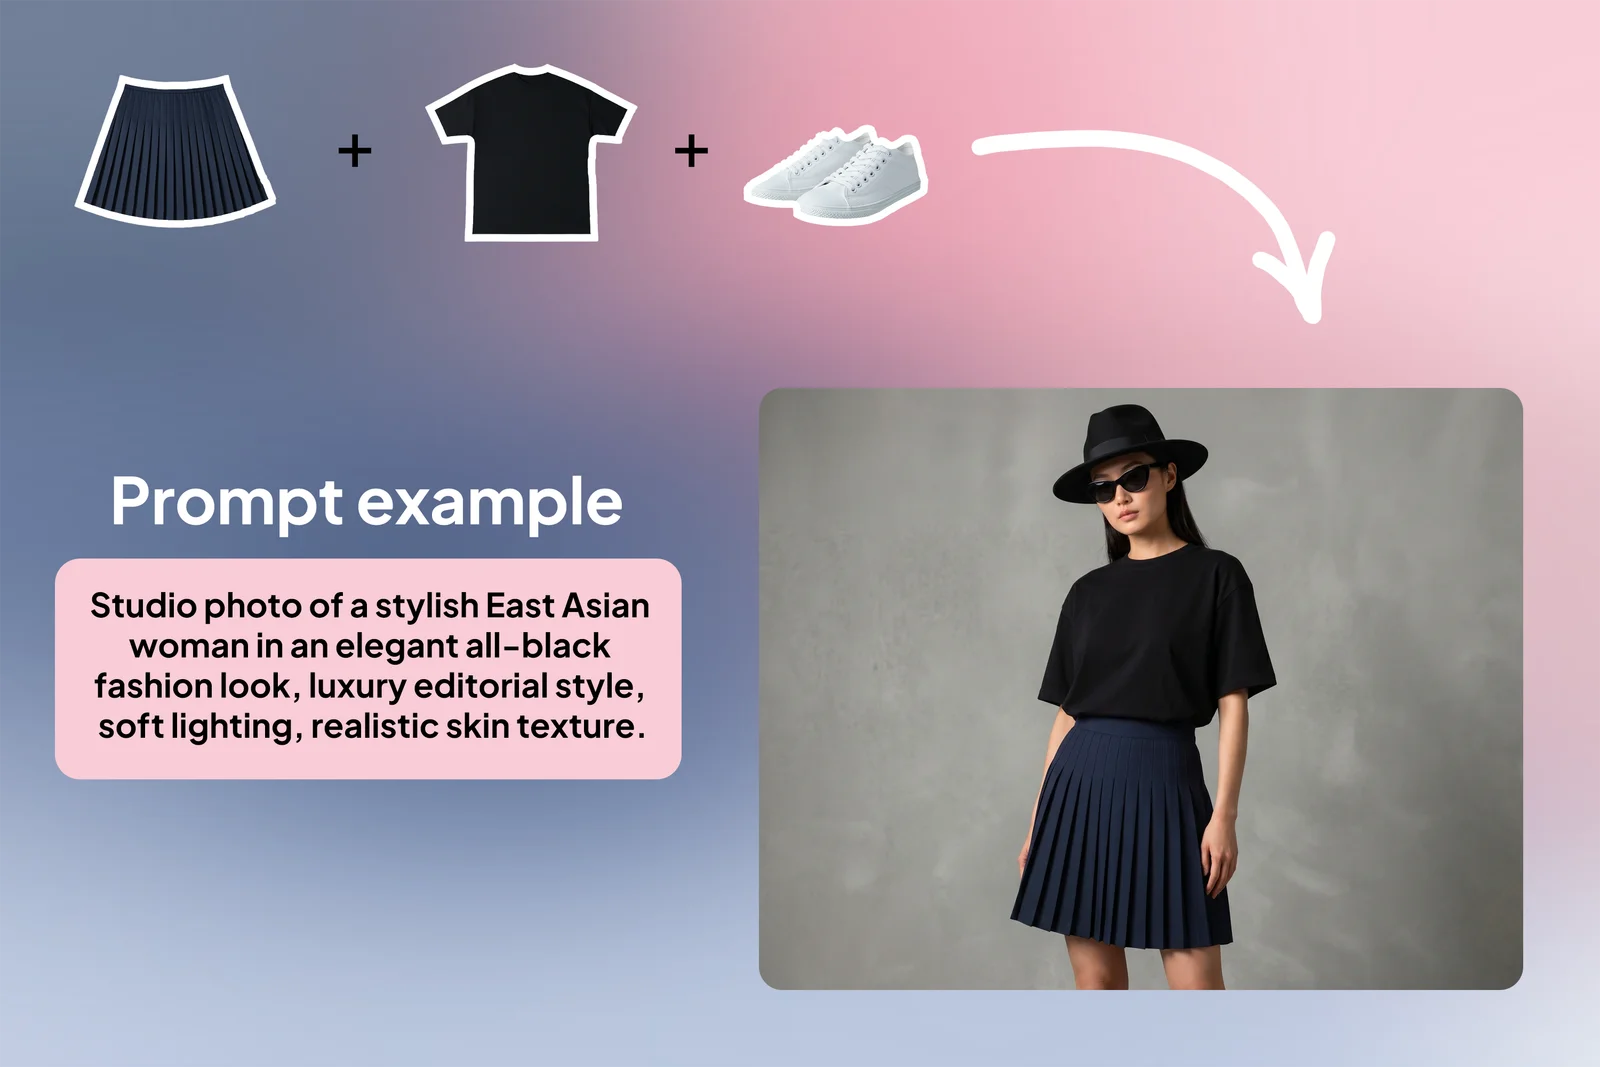
Writing a prompt to guide an AI clothing model photo
If you want variety, the prompt is where you get it. The things worth specifying:
- The scene or location
- Camera angle and lighting
- The model's pose or action
- Any props
- The fit you want, such as oversized, relaxed, or bodycon
You don't need florid prompt-engineering language. Plain, specific instructions beat long paragraphs of adjectives almost every time. "Editorial street shot, overcast light, model walking, garment worn oversized" does more than three sentences of mood words.
Step 5. Generate and refine
Generate a small batch per request rather than a single image. A handful of slightly different options gives you something to actually choose between, and the cost difference is rarely worth the false economy of generating one at a time.
Generating professional clothing photos with AI fashion models
Each generated image counts toward your plan's credits. WearView plans run from Lite through Pro to Advanced, with credit packs available if you need a one-off top-up. There is no free tier, so it is worth checking the pricing page before you plan a large batch run.
When you land on a result you like, you can take it further. Upscale it for print, expand the canvas to hit a marketplace's required dimensions, or turn the still into a short clip with the AI fashion video generator. A product page with a five-second loop of the garment moving converts noticeably better than a static image in most categories.
Scaling fashion photography is no longer the bottleneck
Fast product cycles, high SKU counts, and selling across a dozen channels all demand more imagery than a traditional shoot schedule can realistically produce. Here is where AI models change the economics.
| Old constraint | What it cost you | With AI fashion models |
|---|---|---|
| Booking models, photographers, studios | Weeks of lead time per shoot | Launch new pieces on your own schedule |
| Shooting every variant on diverse models | Budget that scales with SKU count | Cover the full catalog in minutes |
| Inconsistent look across shoots | Mismatched product pages | One unified style without reshooting |
| Different marketplace image specs | Manual reformatting per channel | Generate to the required size and placement |
Smaller and mid-size brands feel this most. They rarely have the time or budget to out-shoot the big players, and that gap shows up directly on the product page. AI fashion photography closes most of it.
This shift is not unique to fashion, either. The same one-photo workflow has reached almost every visual industry; a homeowner can upload a single photo of their yard to OutdoorBrite and get back a finished landscape redesign concept in under a minute. Apparel just happens to be the place where the output ties most directly to sales.
I want to be honest about the trade-off, though. This does not retire real photography. A studio shoot still captures brand identity, texture, and intent in a way that matters for the campaigns people actually remember. The sensible split is to keep human shoots for the few brand-defining moments and let AI cover the high-volume catalog work that was never the fun part anyway. If you are still comparing options, our roundup of the best AI fashion model generators is a reasonable place to start, and you can try the workflow above yourself at WearView.
What this means for you
- Audit your worst product pages first. The SKUs sitting on flatlay-only images are the fastest wins. Run them through product to model before touching anything that already converts.
- Standardize one studio look. Pick a model, pose, and background, then generate every catalog shot against that template. Consistency beats creativity on a product grid.
- Reuse one model across a collection. For lookbooks and campaigns, lock a single AI model so the set hangs together visually.
- Batch, then refine. Generate several options per garment, pick the strongest, then upscale or animate only the keepers.
- Keep real shoots for the campaigns that define the brand. Use AI for volume, not for the hero moment.
FAQ
How does AI fashion photography work? You upload a photo of a garment or full outfit, and a generative model fits it onto an AI generated fashion model in a chosen pose, adjusting for fabric flow, garment length, and body shape. You can guide the result with a prompt that controls scene, lighting, and styling. The better and cleaner your input image, the more accurate the output.
What kind of product photos should I upload for the best results? Use high-quality flatlay or ghost mannequin images on a plain or transparent background. Avoid partial views, distracting props, and styled looks that include accessories you don't want in the final image. Cleaner input means the AI has to invent less, which keeps the result faithful to your real product.
Can I upload multiple clothing pieces? Yes. You can upload a full outfit or separate tops and bottoms. For the best results, keep each upload to the essential pieces so the model doesn't get confused and drop details during generation.
Can I use my own models instead of AI-generated ones? Yes, if you have the legal rights and consent to use their photos. Upload a high-quality full-body reference, ideally in plain underwear or a bodysuit so the tool has a clean base to dress.
Can I control the scene and the model's pose? Yes. Use the prompt to describe background, lighting, styling, camera angle, and pose. For fast product page shots, skip the prompt entirely and you get a clean studio image by default. For tight pose accuracy, use the dedicated pose control feature with a reference image.
How many images can I generate at once? You can generate a small batch per request. Generating three or four options is usually the right call, since it gives you variety to choose from. Each image counts toward your plan's credits.
Is there a free version of WearView? No. WearView does not have a free tier or free credits. Plans run from Lite through Pro to Advanced, with credit packs for one-off top-ups. Check the pricing page for current details before planning a large run.
Can I edit the generated photos afterward? Yes. You can upscale images for print, expand them to different dimensions for specific marketplaces, or turn a still into a short fashion video using the AI video generator.
Are the generated images licensed for commercial use? Yes. All paid WearView plans include full commercial usage rights on the images you generate, so they can go straight onto product pages, ads, and social.
WearView Team
WearView Content & Research Team
WearView Team is a group of fashion technology specialists focused on AI fashion models, virtual try-on, and AI product photography for e-commerce brands. We publish in-depth guides, case studies, and practical insights to help fashion businesses improve conversion rates and scale faster using AI.