January 15, 2026•23 min read
How to photograph clothing flat lays to look clean and professional?
Master flat lay clothing photography with this guide. Learn professional techniques for lighting, styling, and editing to create clean, compelling images.

How to photograph clothing flat lays to look clean and professional?
Flat lay clothing photography is simple in concept: you arrange apparel on a flat surface and shoot it from directly above. The result is a clean, minimalist look that’s become a go-to for e-commerce sites and polished social media feeds. It’s a fantastic way to show off a garment’s true shape, texture, and details without a model getting in the way.
Why Flat Lays Are a Game Changer for Fashion E-Commerce
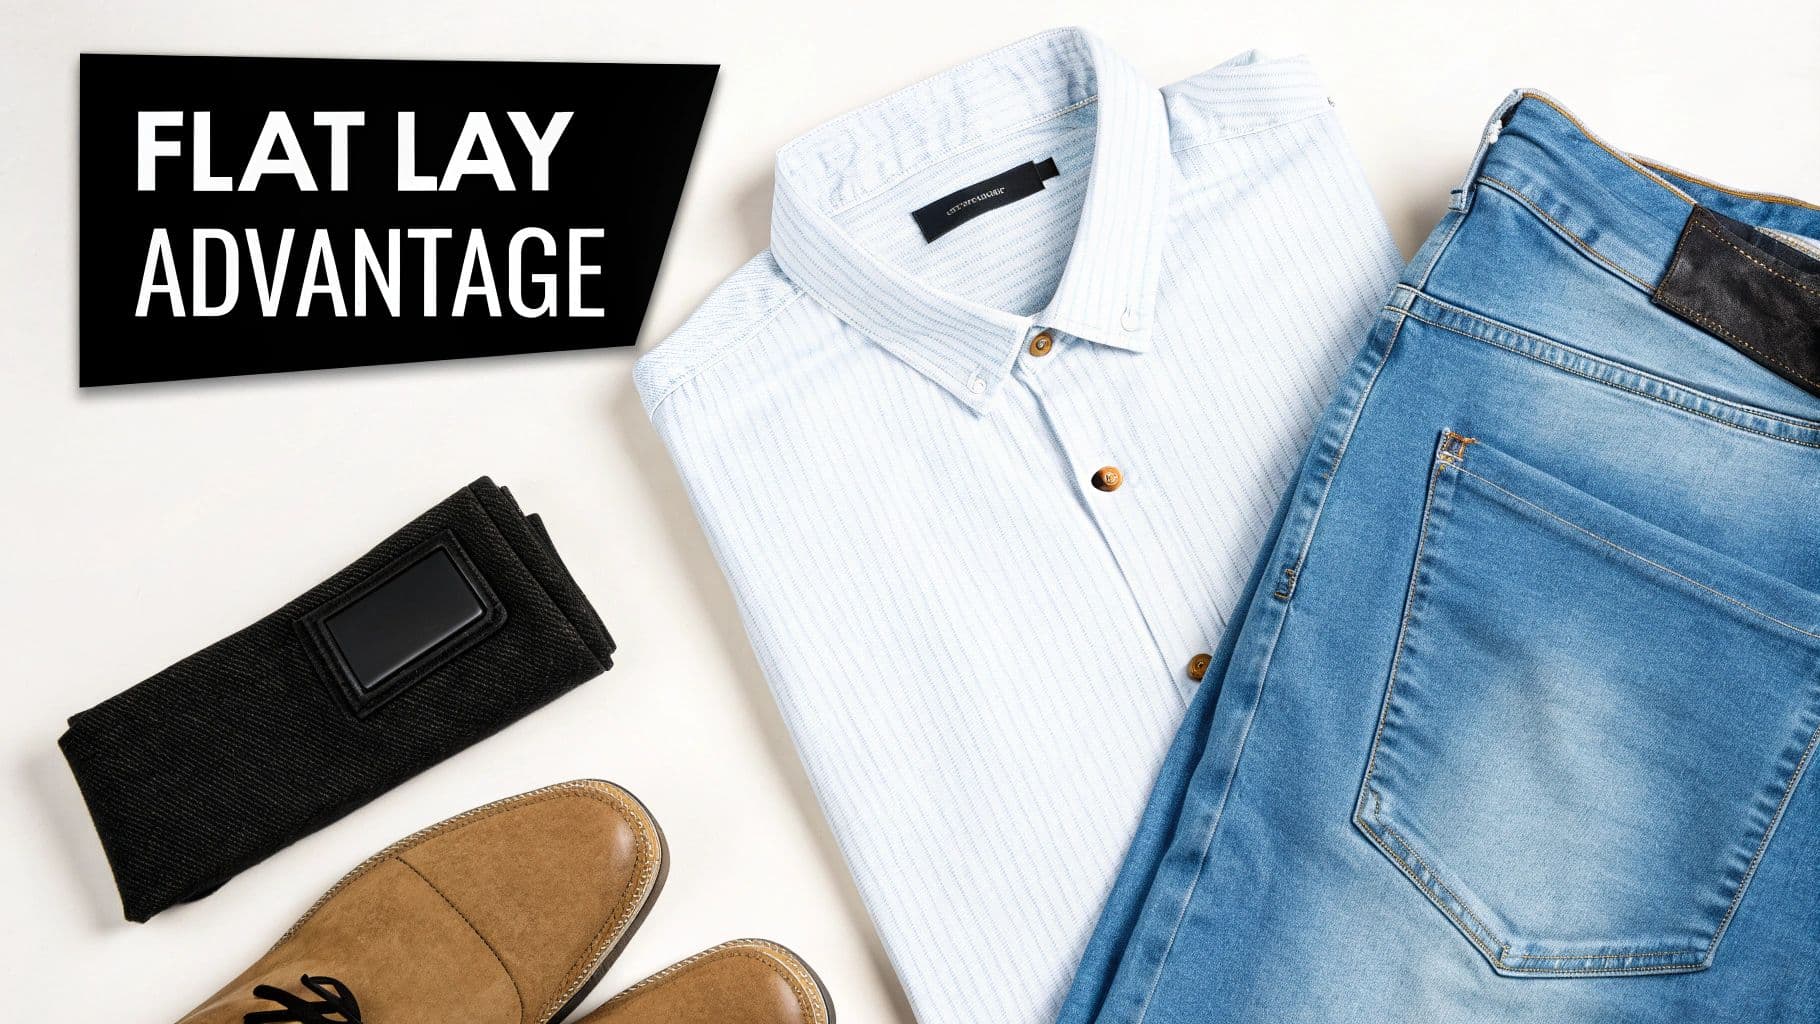
Flat lay of men's fashion: blue striped shirt, jeans, brown shoes, black accessory. Text: 'FLAT LAY ADVANTAGE'.
Selling clothes online comes with a massive challenge: how do you make someone feel the quality of a garment through a screen? That's where flat lay photography comes in. It’s not just a trend; it's a smart visual strategy that solves some of the biggest headaches in fashion e-commerce.
The biggest win with a flat lay is clarity. By taking a model’s body shape and posing out of the equation, the clothes get to be the star. Customers see the exact cut of a neckline, the real silhouette of a dress, and the way the fabric actually drapes. This directness builds trust and manages expectations, which is a proven way to cut down on returns.
Building a Cohesive Brand Identity
Consistency is everything when you're building a brand. Flat lays make it ridiculously easy to create a uniform look across your entire product catalog. Once you nail down your background, lighting, and general composition, you’ve created a distinct visual language customers will instantly recognize as yours.
This consistent look works everywhere—not just on your website. Great flat lays are the building blocks for a beautiful Instagram grid, professional lookbooks, and compelling email campaigns. Understanding the power of solid visual content marketing strategies shows just how much a consistent aesthetic can do for a brand.
The market has definitely caught on. In fact, 61% of high-end fashion e-commerce businesses now use flat lays as a core part of their presentation. It's clear that premium brands see the value in showing off product quality and design without the higher costs and complexities of model shoots.
Efficiency and Versatility in Content Creation
Beyond just looking good, flat lays are incredibly practical. The shooting process is usually much faster and requires way less coordination than a full-on model photoshoot. For brands in the fast-paced fashion world, this speed means getting new arrivals online quicker.
A well-organized flat lay workflow lets you photograph dozens of products in a single day. That's a huge advantage for keeping your store fresh and accelerating your time-to-market.
This efficiency pays off down the road, too. High-quality flat lays are the perfect starting point for advanced AI tools like WearView, which can take that simple garment photo and generate stunning, realistic on-model images. You get the best of both worlds: the clean, detailed view from the flat lay and the relatable context of a model shot, all from one efficient photoshoot.
Building Your At-Home Photography Studio
You don’t need a massive commercial space or a Hollywood-sized budget to create professional-looking flat lay photos. The secret is building a small, effective at-home studio that gives you total control over your environment. It’s far more achievable than most people think.
In fact, many brands get started with the powerful camera they already carry everywhere: their smartphone. Modern phone cameras are incredible, but they need a little help with stability and light to truly shine. The right accessories can transform a simple phone into a legitimate tool for creating high-quality e-commerce images.
Your Core Gear, Regardless of Budget
Whether you’re shooting on a smartphone or a high-end camera, a few pieces of equipment are simply non-negotiable for getting that clean, consistent look that builds trust with customers. Think of these as the foundation of your entire flat lay setup.
- A Sturdy Tripod with an Overhead Arm: This is, without a doubt, your single most important investment. A standard tripod just won’t cut it for flat lays because you need to shoot straight down. An overhead or horizontal arm is the key, letting you position your camera perfectly parallel to the floor. This eliminates weird angles and ensures every shot is consistent.
- Versatile Backgrounds: The background sets the entire mood of your photo. You can start simple with a roll of white seamless paper, a large foam core board from a craft store, or even a textured vinyl backdrop. The goal is to choose a surface that makes your clothing pop without distracting from it. Neutral is almost always better.
- A Remote Shutter or Timer: Even the slightest touch of the shutter button can create a tiny camera shake, resulting in a blurry photo. A simple Bluetooth remote for your phone or a cable release for your camera is a cheap, game-changing tool that guarantees every image is tack-sharp.
If you want to get more in-depth on laying out a dedicated space, our guide on creating a cost-effective e-commerce photo studio has more detailed tips that can really help you get started.
Choosing Your Camera: Smartphone vs. DSLR
The classic debate between a smartphone and a dedicated camera usually boils down to budget and your need for manual control. Let's be clear: a high-end smartphone can absolutely produce stunning images for your website, especially when you give it great light.
However, a dedicated DSLR or mirrorless camera offers some serious advantages. The biggest is the ability to use interchangeable lenses—a 50mm prime lens is a fantastic and surprisingly affordable choice for flat lays that delivers incredibly sharp images with minimal distortion. You also get full manual control over settings like aperture, shutter speed, and ISO, which is the secret to achieving perfectly consistent lighting and color across an entire product collection.
The best camera is the one you have, but the best results come from a camera that gives you full manual control. Start with your phone, nail your process, and think about upgrading to a DSLR or mirrorless system as your brand grows.
To make the gear selection process easier, here's a breakdown of where to start and what to upgrade to as your business scales.
Essential vs. Upgraded Gear for Flat Lay Photography
This table compares budget-friendly starting equipment against professional upgrades, helping you decide where to invest your money first.
| Equipment Type | Budget-Friendly Option | Professional Upgrade |
|---|---|---|
| Camera | Modern Smartphone (iPhone, Pixel, etc.) | DSLR or Mirrorless Camera with a 50mm lens |
| Tripod | Basic Tripod with a separate Horizontal Arm | Integrated C-Stand with a Boom Arm |
| Lighting | Large Window (Natural Light) | Artificial Lighting Kit (e.g., two softboxes) |
| Background | White Foam Core Board or Seamless Paper | Textured Vinyl Backdrops or Custom Surfaces |
| Light Modifier | White Reflector Card (to soften shadows) | Diffuser Panel (to create softer, larger light) |
| Shutter Release | In-camera Timer or Bluetooth Remote | Wired Remote Shutter Release or Tethered Shooting |
Ultimately, the "upgraded" gear just gives you more control and consistency, which saves you a ton of time in editing later on.
Lighting: The Make-or-Break Element
Lighting is what truly separates an amateur snapshot from a professional e-commerce photograph. You really have two paths you can go down: natural light or artificial light.
Natural light, streaming in from a large window, is beautiful and free—but it's also wildly inconsistent. The color and intensity of the light change constantly throughout the day and with the weather. If you decide to go this route, make sure you shoot at the same time every day and use a simple reflector (like a piece of white foam core) to bounce light back into the shadows for a softer look.
For bulletproof consistency, an artificial lighting kit is the only way to go. You don’t need to spend a fortune. A pair of affordable softboxes with continuous LED bulbs will give you soft, diffused light that you can control completely. This means your white t-shirts will be the exact same shade of white whether you shoot them on a sunny morning or a gloomy afternoon. That level of consistency is absolutely vital for building a professional and trustworthy online store.
Dialing In Your Lighting and Camera Settings
Great lighting and the right camera settings are what separate crisp, professional photos from dull, amateur ones. Once you have your studio set up, this is where the magic really happens. If you want to go deeper on lighting theory, exploring a guide to a perfect product photography lighting setup is a great next step, but we’ll cover the essentials right here.
The goal is always to create soft, even illumination. Hard light from a bare bulb or direct sun creates harsh, dark shadows that obscure detail and can make fabrics look cheap. You want light that wraps around the garment, revealing its texture and keeping the colors true to life.
Here's a simple diagram showing the core components of a solid flat-lay station.
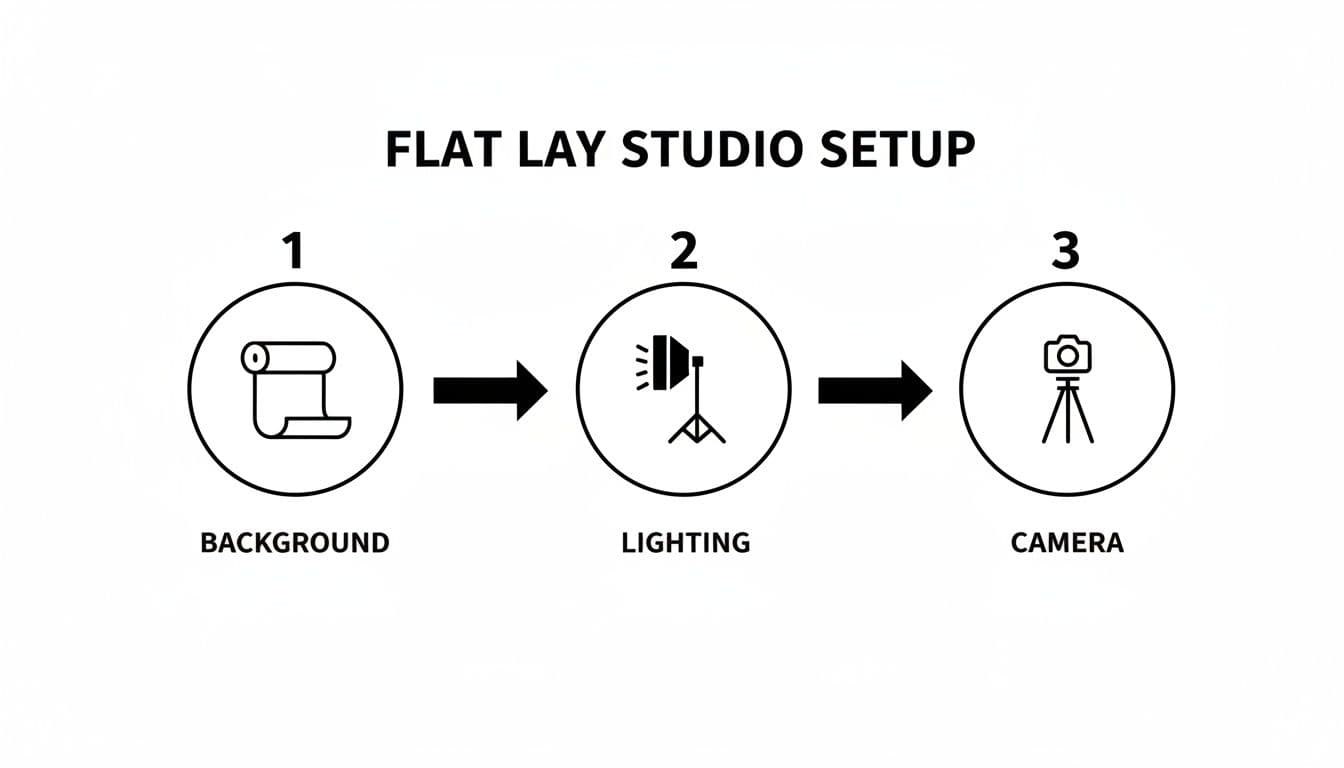
A step-by-step diagram illustrating the essential flat lay studio setup with background, lighting, and camera.
Think of it as a logical workflow: start with your foundation (the background), add your light, and then position your camera to capture the image. Getting this flow right makes the whole process so much smoother.
Mastering Your Light Source
Whether you use natural light from a window or an artificial strobe, control is the name of the game.
If you're lucky enough to have a large window, position your setup at a 45-degree angle to it. This angle creates soft, dimensional shadows that give the garment shape. Just be sure to avoid direct, piercing sunlight at all costs. An overcast day is your best friend.
For total control and consistency shot after shot, a single large softbox is the way to go. Position it at a 45-degree angle to your setup, just like you would with a window. Then, on the opposite side, place a large white foam board or reflector. This bounces light back, filling in any shadows and creating that bright, clean look you see in professional e-commerce shots.
Key Camera Settings for DSLRs and Mirrorless Cameras
If you’re using a dedicated camera, switching to Manual Mode (M) gives you complete control and ensures every photo is consistent. It might sound intimidating, but for flat lays, you really only need to lock in three core settings.
- Aperture (f-stop): This controls how much of your image is in focus. For flat lay clothing, you want the entire garment to be sharp, from the collar to the hem. To do this, you'll need a "deep depth of field," which you can get by setting your aperture to a higher number, like f/8 or f/11.
- ISO: This is your camera's sensitivity to light. A low ISO means a cleaner, higher-quality image with less grain or "noise." Always, always keep your ISO as low as your camera will go, which is usually ISO 100 or 200.
- Shutter Speed: With your aperture and ISO locked in, shutter speed is the final piece of the exposure puzzle. Simply adjust it up or down until your camera's light meter reads "0." Because your camera is on a tripod, you don't have to worry about camera shake, so you can use a slower shutter speed (like 1/60th of a second or even slower) without a problem.
Pro Tip: Always use a remote shutter release or your camera's two-second timer. The simple act of pressing the shutter button can introduce a tiny vibration, making your image just a little less sharp. This one extra step is a simple guarantee for maximum sharpness in every shot.
Smartphone Photography Tips for Flawless Flat Lays
Don't have a fancy camera? You can absolutely get amazing results with your phone. Modern smartphone cameras are incredibly powerful, but you have to know how to take control.
First, the obvious but often forgotten step: clean your lens. A quick wipe with a microfiber cloth can make a massive difference in image clarity. From there, stick with your phone's native camera app—it gives you the most control.
Essential Smartphone Settings:
- Turn on the Grid: Dig into your camera settings and enable the grid lines. This is non-negotiable for aligning your clothing and making sure your camera is perfectly level with the floor.
- Lock Focus and Exposure: Frame your shot, then tap and hold on the garment. A yellow box will pop up, often with an "AE/AF LOCK" notification. This is huge. It locks the focus and exposure, preventing the brightness from flickering between shots and ensuring a consistent look across all your product photos.
- Adjust Brightness Manually: Even after locking focus, you can fine-tune the brightness. Just slide your finger up or down on the little sun icon that appears next to the focus box. Aim for a bright, clean exposure, but be careful not to "blow out" the highlights, especially on white or light-colored fabrics.
By taking charge of these simple settings, you stop just snapping pictures and start intentionally crafting professional images—no matter what gear you're using.
The Art of Styling Clothes That Sell
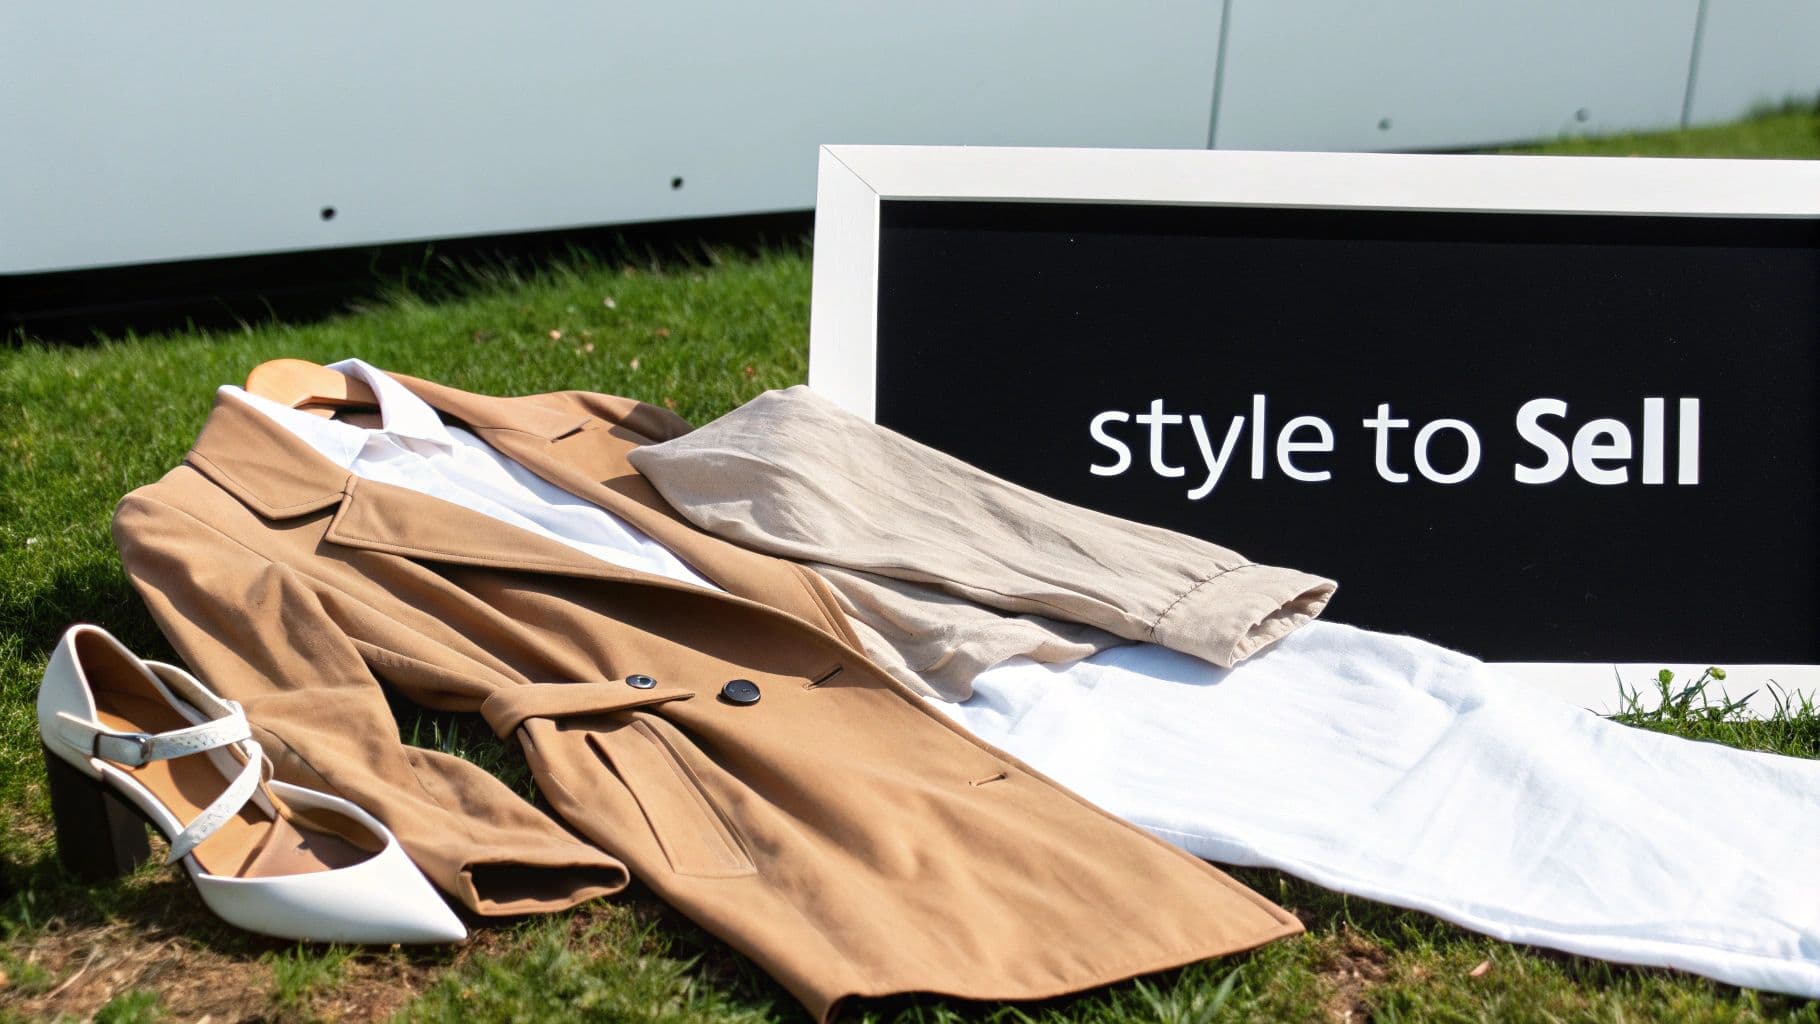
Flat lay of a trench coat, shirt, pants, and heels on grass, near a 'Style to Sell' sign.
This is where the magic happens. A great photo isn't just about documenting a piece of clothing; it's about selling a feeling, a look, a lifestyle. Proper styling is what turns a simple piece of fabric into something a customer has to have. It tells a story, highlights quality, and helps them see themselves wearing your designs.
And this isn't just a niche trend. The power of a good flat lay is undeniable. Between April and May alone, flat-lay visuals saw a 43% spike in use among 200 beauty brands. It's a visual language customers understand and engage with. Just look at Instagram, where the #Flatlay hashtag has been used on nearly 8.9 million posts. You can dig into some fascinating information on the flat lay trend and its engagement statistics to see just how effective this style has become.
The Non-Negotiable Prep Work
Let me be blunt: if you skip the prep work, your photos will look cheap. This is 90% of the battle and the single biggest difference between amateur and professional-looking shots.
First things first, steam everything. Every single crease, fold, and wrinkle from shipping will show up under your lights and immediately cheapen the garment's appearance. A good handheld steamer is your best friend—it's much gentler on fabrics than a traditional iron.
Next, get yourself a lint roller and a microfiber cloth. Keep them within arm's reach at all times. Tiny specs of dust, stray threads, or pet hair might be invisible to your naked eye, but they'll pop out in a high-resolution image. Give every item a final, thorough once-over right before you place it on your background.
Creating Shape and Dimension
The hardest part of flat lay photography is avoiding the "lifeless blob" effect. You need to make a garment look like it has a shape, hinting at the human form underneath without actually showing it. The goal is to create subtle volume and natural-looking folds that guide the eye.
Styling Techniques for Natural Shape:
- Tissue Paper Magic: This is an old stylist's trick. Ball up some acid-free tissue paper and gently stuff it into the shoulders of a shirt, the torso of a dress, or the hips of jeans. This simple move lifts the fabric just enough to create realistic volume.
- The Gentle "S" Curve: Don't lay sleeves or pant legs perfectly straight. It looks stiff and unnatural. Instead, create a soft, gentle "S" curve. This small adjustment adds a feeling of movement and makes the whole layout more dynamic.
- Strategic Tucking: When shooting a button-down shirt or a jacket, try slightly tucking one side under the other at the waist. This little maneuver can suggest a more fitted silhouette and show how the garment might drape on a body.
A great flat lay guides the viewer's eye. Use gentle curves and folds to create leading lines that draw attention to key features like a unique collar, a detailed pocket, or the quality of the fabric.
Don't be afraid to use some tools to get the perfect shot. A tiny piece of double-sided fashion tape can hold a collar down, and small, hidden pins can tame a stubborn fold. The trick is making sure none of your handiwork is visible to the camera.
Composition and Layout Strategies
Once your garment is prepped and looking its best, it's time to arrange it. The composition is everything—it sets the mood, from clean and minimalist to a complete, styled outfit.
Depending on your brand's vibe and where the image will be used, there are a few tried-and-true approaches you can take.
Common Flat Lay Compositions:
- The Hero Shot: This is your classic, minimalist layout focused on a single item. It's perfect for product pages where you need to show off the details clearly. Center the item and give it plenty of negative space to breathe. This makes it feel more premium.
- The Grid Layout: For showing a full outfit, arranging items in a neat grid works wonders. It's clean, organized, and ideal for "Shop the Look" features on social media or in email newsletters. Use your camera's gridlines to get everything perfectly aligned.
- The "Lived-In" Composition: This style is a bit more relaxed and organic. Think of a sweater casually draped next to a pair of jeans, with boots nearby. It feels more relatable and tells a story, which is great for building your brand's lifestyle aesthetic.
Using Props to Add Context
Props can elevate a photo from a simple product shot to a story, but you have to be careful. The wrong prop just creates clutter and distracts from what you're actually trying to sell. The golden rule: every prop must add context or enhance the brand's aesthetic.
Prop Selection Best Practices:
- Relevance is Key: Shooting a summer dress? Sunglasses, a straw hat, or simple sandals make perfect sense. They reinforce the story of the garment.
- Maintain Your Color Palette: Props should complement your brand's colors, not fight with them. I usually stick to a tight palette of two or three colors to keep things cohesive.
- Mind the Scale: Make sure your props are sized appropriately. A huge, oversized handbag next to a delicate top can throw off the entire composition's balance.
- Less is More: This is probably the most important tip. When in doubt, leave it out. A few well-placed, meaningful props are way more powerful than a table full of random junk. The clothing should always be the star.
Editing Your Photos for a Polished Finish
This is where the magic happens. The final editing pass is what separates a decent snapshot from a professional, high-converting product photo. Post-processing isn't about faking it; it's about adding that final layer of polish and making sure the digital image is a perfect twin of the real-world garment.Think of this as your final quality check before an image goes live. You're aiming for bright, clean, and consistent shots—the kind of quality that builds trust and signals a premium brand.
The Foundational Editing Workflow
To stay sane and efficient, you need a repeatable process. Don't just jump in and start pulling sliders at random. A structured workflow ensures every single image gets the same treatment, creating a cohesive look across your entire product catalog.
Start with the absolute essentials. These are the non-negotiable adjustments every flat lay photo needs.
- Cropping and Straightening: Your first move should always be to straighten the image. Use the grid lines in your editing software to make sure the garment is perfectly aligned. Then, crop consistently—maybe a 1:1 square for Instagram or a 4:5 vertical for product pages—so everything looks uniform on your site.
- White Balance Correction: This is probably the most critical step for any fashion brand. Your colors have to be true to life. Use the white balance eyedropper tool and click on a truly neutral area (like a white or gray part of the garment) to instantly kill any weird color casts from your lights. A white tee should look pure white, not slightly yellow or blue.
- Exposure and Contrast Adjustments: Now, bring the photo to life. Brighten it up so it feels clean and airy. Tweak the highlights to make sure your whites aren't blown out, and lift the shadows just enough to bring out the texture in the fabric. A gentle S-curve in your tone curve settings can add a beautiful, subtle pop of contrast that makes the image feel more dynamic.
If you want to go deeper on these techniques, checking out some dedicated guides on e-commerce image editing can give you more advanced tricks that build on this foundation.
Retouching for a Flawless Finish
Once the basic color and light corrections are locked in, it's time to zoom in and handle the tiny details. This is where you zap any small imperfections that might distract a potential customer from the product itself.
Your main weapons here will be the Spot Healing Brush or the Clone Stamp Tool in programs like Adobe Photoshop or Lightroom. Get comfortable zooming way in and scanning the garment section by section.
What to look for:
- Stray lint, dust, or tiny hairs
- Minor wrinkles or creases your steamer couldn't quite get
- Any small scuffs or marks on your background
The goal of retouching is to remove temporary distractions, not to alter the product. A speck of dust isn't part of the sweater, but a unique fabric slub might be. Use your best judgment to keep it authentic.
This level of detail sends a powerful signal to your customers. It shows you care about quality and presentation, which builds the confidence they need to click "add to cart."
The Power of Batch Editing with Presets
Let's be real: editing dozens of photos one by one from scratch is a soul-crushing time sink. This is where batch editing and presets come in to save the day (and your schedule).
A preset is simply a saved recipe of your editing settings. Once you've perfected one photo from a shoot—nailing the white balance, exposure, contrast, and sharpening—you can save all those adjustments as a custom preset.
Now for the brilliant part. You can apply that preset to every other photo from that same session with a single click. Because you kept your lighting and camera settings consistent during the shoot, this one move will get 90% of your editing work done instantly. You'll likely just need to make tiny exposure tweaks here and there, but the core look is set.
Creating a brand-specific preset in a program like Adobe Lightroom is a total game-changer for scaling your photography. It not only frees up countless hours but also guarantees your entire website and social media feed have a cohesive, professional aesthetic. That visual consistency is what builds a strong, recognizable brand in a very crowded market.
Common Questions About Flat Lay Photography
Even after you've got your gear sorted, flat lay photography has a way of throwing you a curveball. One minute, you're dealing with a rogue shadow that won't budge; the next, an outfit just looks… limp. Let's tackle some of the most common hurdles I see brands struggle with and get you the practical fixes you need.
A lot of these issues come down to making clothes look like they have a body in them, even when they don't. This is a skill that crosses over into other areas of product photography, too. If you're trying to master that "floating" look, digging into the techniques behind ghost mannequin photography can teach you a ton about shaping and styling garments for the camera.
How Do I Keep My Lighting Consistent?
Inconsistent lighting is the fastest way to make an e-commerce site look amateur. When your whites look warm in one shot and cool gray in the next, it sends a confusing message to your customers and cheapens your brand's look.
The most reliable way to fix this is to stop using natural light. I know, window light is beautiful, but it's also unpredictable. Switching to a controlled artificial setup, like a single large softbox, gives you total command. Every single photo will have the same brightness and color temperature, whether you're shooting at 9 AM or 9 PM.
If you absolutely have to use window light, be religious about it. Shoot at the exact same time of day for every session and lock in your camera's white balance with a custom setting. Just take a photo of a white card before you start, and set that as your custom white point.
Why Do My Clothes Look Stiff and Lifeless?
This is the classic flat lay problem. You lay a shirt down perfectly, and it just sits there like a piece of paper. The goal isn't to make it look like it's on a person, but to suggest a human form is nearby.
Stylist's Secret: Grab some acid-free tissue paper, ball it up, and gently tuck it under the shoulders, hips, or torso of the garment. This one trick is a game-changer. It lifts the fabric just enough to create soft, believable volume, instantly turning a flat item into something with life and appeal.
Another pro tip: kill the perfectly straight lines. A sleeve or pant leg laid out like a ruler looks robotic. Instead, create a subtle "S" curve. This tiny bit of styling implies natural movement and makes the whole layout feel more dynamic.
What’s the Best Background for My Brand?
The background is your supporting actor—it should make the product the star. Get it wrong, and it becomes a noisy distraction. There's no single "best" choice, but the right one will always complement your clothing and match your brand's vibe.
- For a clean, minimalist brand: You can't go wrong with a big sheet of seamless white paper or a neutral foam core board. It's clean, non-reflective, and forces all the attention onto your product.
- For a rustic or lifestyle brand: Think about adding some texture. Light wood vinyl backdrops, linen fabric, or even a clean, sealed concrete surface can add a layer of warmth and context that tells a bigger story.
The golden rule here is to avoid busy patterns and loud colors that fight with your clothes for attention. Your background should set the stage, not try to steal the show.
Ready to take your flat lay photos to the next level? With WearView, you can transform your clean, professional flat lays into stunning on-model imagery—or create invisible mannequin visuals—in seconds. Stop coordinating expensive photoshoots and start creating endless high-quality content that drives sales. Generate your first on-model photo today.

WearView Team
WearView Content & Research Team
WearView Team is a group of fashion technology specialists focused on AI fashion models, virtual try-on, and AI product photography for e-commerce brands. We publish in-depth guides, case studies, and practical insights to help fashion businesses improve conversion rates and scale faster using AI.