When you sell apparel online, your product photos aren't just pictures—they're your digital fitting room. They have to do all the heavy lifting, convincing a customer who can't touch the fabric or see the fit in person. It’s about capturing the details, the drape, and the style in a way that builds trust and drives someone to click "add to cart."
Why Great Apparel Photography is Non-Negotiable
Let's be blunt: in fashion e-commerce, your photos are your best salespeople. Since shoppers can’t physically interact with the clothes, your images have to bridge that gap. They must instantly communicate texture, quality, and how a garment will actually look and feel.
This isn't just a hunch; it's backed by data. A staggering 75% of online shoppers say product images are the most influential factor in their decision to buy. Your photos set expectations, and they're often the final tipping point between a sale and a lost customer.
The Three Core Photography Styles You Need to Master
Choosing how to shoot your apparel is a strategic move that needs to align with your brand vibe and who you're selling to. There are three foundational styles that every apparel brand should know.
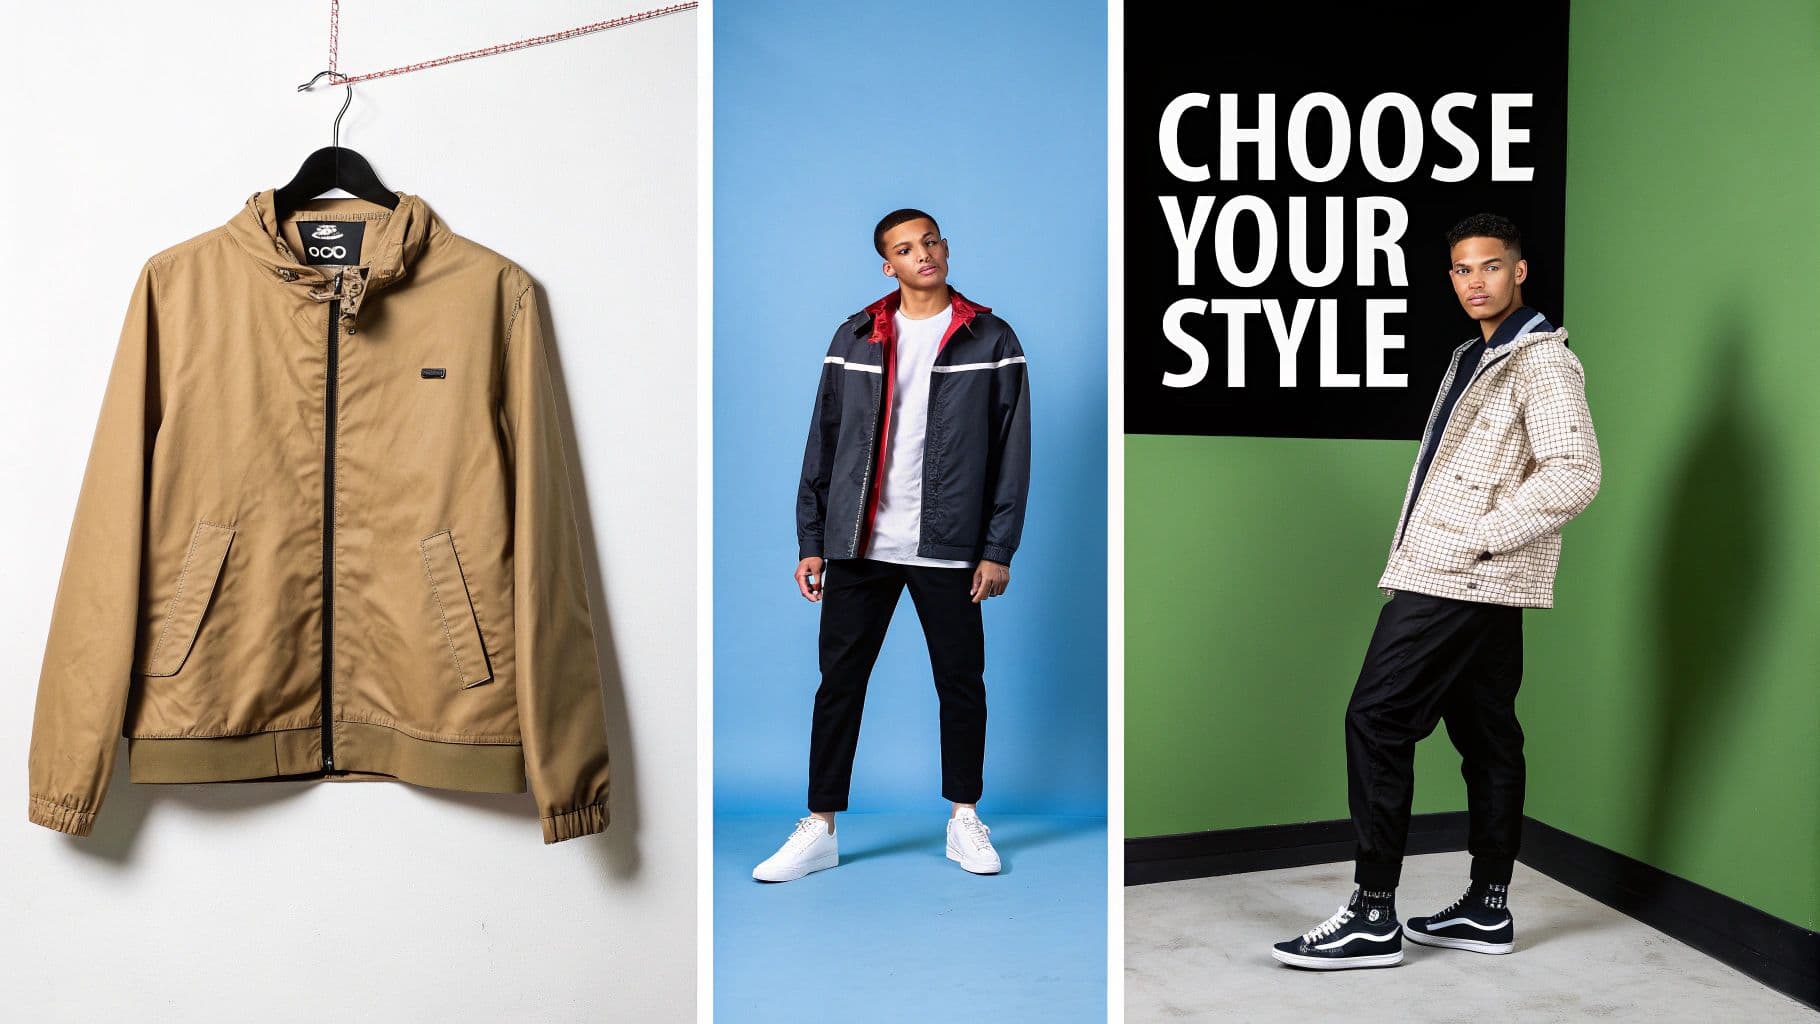
Multiple men's fashion styles presented, featuring various jackets and outfits, with a 'Choose Your Style' message.
Here's a quick breakdown to help you decide which approach—or combination of approaches—is right for your brand.
Choosing Your Apparel Photography Style
| Photography Style | Best For | Pros | Cons |
|---|---|---|---|
| Flat Lay | Showcasing intricate details, patterns, and construction. Ideal for social media and minimalist brands. | Clean, artistic, and highlights product features without distraction. Easy to style creatively. | Lacks shape and drape; can make it hard for customers to visualize fit. |
| Hanger | Product listings that need consistency and efficiency. Great for showing a garment's natural shape. | More realistic drape than flat lay. Fast and cost-effective for large catalogs. | Can feel generic or low-budget if not styled well. Doesn't show movement or fit on a body. |
| On-Model | Conveying fit, movement, and lifestyle. The best option for building an aspirational brand image. | The gold standard for helping customers visualize fit. Builds emotional connection. | Highest cost and most time-consuming. Requires models, stylists, and coordination. |
Ultimately, you'll want to use a smart mix of these styles to tell a complete product story.
Key Takeaway: The best strategy is a hybrid one. Lead with a compelling on-model hero shot, then support it with detailed flat lays of the fabric and a clean hanger shot showing the back of the garment. This combination answers nearly every question a customer might have.
The AI Revolution in Fashion Imagery
While traditional photoshoots have their place, they’re also expensive, slow, and logistically complex. This is where AI is completely changing the game.
New AI-powered tools now make it possible to generate photorealistic on-model images from a single, simple flat-lay photo. This isn't science fiction; it's a practical way for brands to slash photoshoot costs, instantly improve model diversity, and get new collections online faster than ever. Understanding how to integrate these solutions is no longer a "nice to have"—it's becoming essential for building a modern, scalable visual strategy.
Planning Your Photoshoot for Flawless Execution
Here’s a truth every seasoned pro knows: exceptional product shots aren’t made on shoot day. They’re made in the planning. A well-thought-out pre-production plan is the single biggest difference between a chaotic, budget-burning disaster and a smooth, efficient day that delivers exactly what you need.
Think of it as the blueprint for your entire shoot. Get this right, and you eliminate the expensive guesswork when the clock is ticking and the camera is rolling.
Build a Detailed Shot List
Your shot list is, without question, the most critical document you'll create. It's not just a list; it's your game plan, your script, and your safety net, ensuring no critical angle or product variation gets forgotten in the heat of the moment.
For every single garment, you need to break down the exact shots required. Don't be vague.
- Essential Angles: Lock down the non-negotiables first. Front, back, and a 45-degree angle are standard for a reason—they give a complete view.
- Detail Shots: Where does your product shine? Is it the custom embroidery, the unique button details, the texture of the fabric? List every close-up you need to capture that value.
- Styling Variations: How will customers actually wear it? Document every variation you want to show, like a jacket shot both open and zipped, or a shirt styled tucked and untucked.
- Model Poses: If you’re shooting on-body, pre-plan a few key poses that really showcase the garment's fit, drape, and movement.
A rock-solid shot list keeps the entire team—photographer, stylist, model—perfectly aligned and ensures your final catalog tells a consistent, compelling story.
Selecting the Right Model
The person wearing your clothes has a massive impact on how customers connect with your brand. This isn't just about finding someone who fits the sample size. It’s about finding a face, a vibe, and a presence that embodies your brand’s entire identity.
Who is your ideal customer? Are they edgy and urban, or aspirational and adventurous? Your model should feel like a natural extension of that world. It’s also why more brands are now using AI-generated models to nail a very specific aesthetic, maintain perfect consistency across hundreds of products, or showcase true diversity without the logistical headaches of a massive casting call.
Whether human or AI, the goal is the same: to help your customer visualize themselves in your product. The model is the bridge between the garment on the screen and the shopper's aspiration.
Meticulous Garment Preparation
Nothing tanks a product shot faster than a wrinkled, ill-fitting garment. The camera is ruthless; it sees every tiny flaw, every loose thread, every clumsy fold. Meticulous prep isn't just a nice-to-have, it's completely non-negotiable.
Before a single item makes its way to the set, it needs a bit of love.
- Inspect Every Piece: Give each garment a once-over. Check for loose threads, small stains, or any shipping damage. It’s infinitely easier to fix a loose button now than to pay an editor to fix it in 50 different photos later.
- Steam and Iron: This is Styling 101. Every single item must be perfectly steamed or ironed. Pay extra attention to collars, cuffs, and hemlines—the areas that betray a lack of care immediately.
- Use Styling Tools: Your on-set kit should be armed with the essentials: clips, pins, fashion tape, and anything else you need to get the perfect fit. These are the secret weapons for creating a flawless drape and ensuring the garment hangs just right on your model or mannequin.
Proper prep ensures your clothing looks premium and reflects the quality of your brand. It’s this obsessive attention to detail that builds trust with your customers. Understanding all these moving pieces also brings the financial side into focus; we break down the numbers in our guide to the real cost of fashion photoshoots.
Mastering Your Camera and Lighting Setup
With a solid plan locked in, it’s time to get hands-on with the technical heart of apparel product photography: your camera and lighting. Nailing these two elements is what separates amateur shots from sharp, color-accurate, professional images. This isn’t about owning the most expensive gear; it’s about knowing how to use what you have to get the exact look you're after.
This is the moment your creative vision becomes a tangible, high-quality photograph. Let's break down the essential camera settings and lighting principles into simple, actionable advice.
Before we jump into the settings, here’s a quick look back at the planning process we've covered. Think of it as the foundation for a successful shoot.
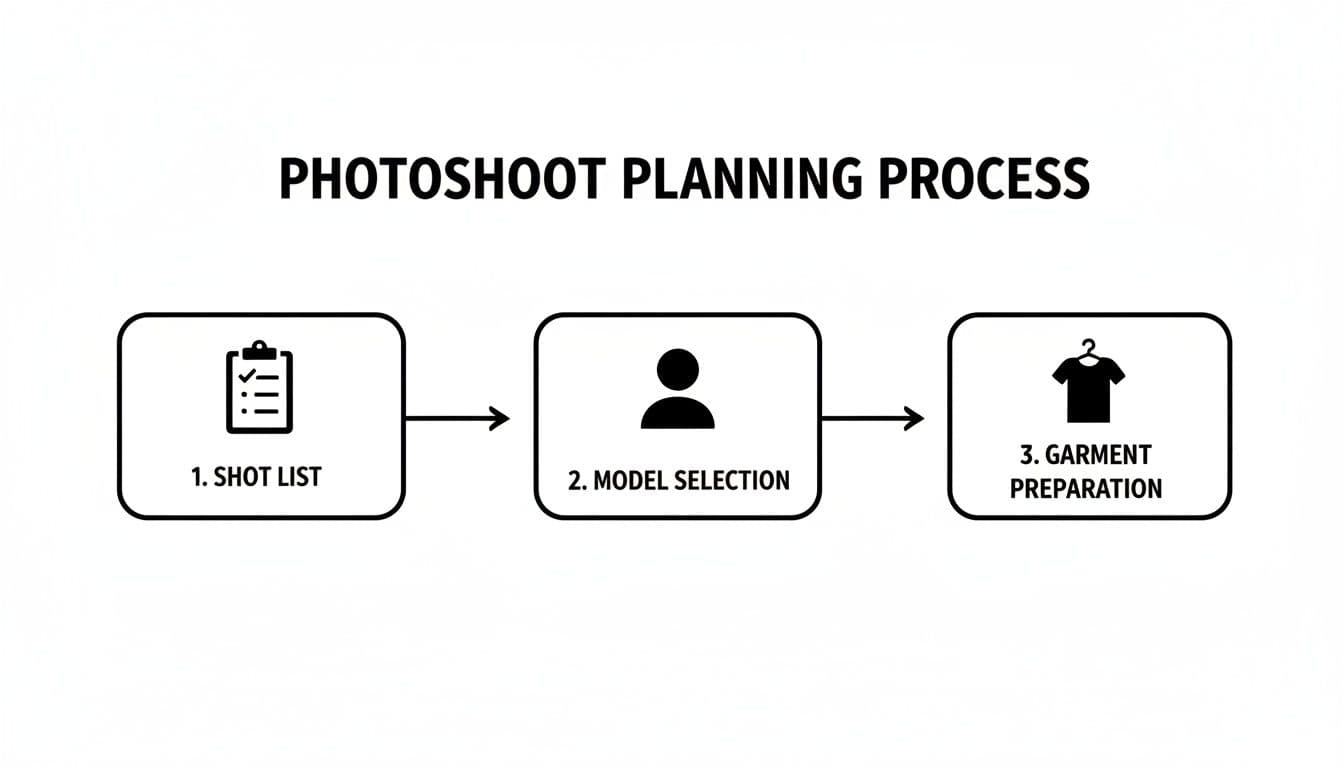
A flowchart outlining the photoshoot planning process, including shot list, model selection, and garment preparation.
As you can see, a great shoot is built on a detailed shot list, thoughtful model selection, and meticulous garment prep. Now, let's build on that foundation.
Dialing in Your Camera Settings
Your camera has three core settings that work together to control the final image. Pros call it the "exposure triangle": Aperture, ISO, and Shutter Speed. Get these right, and you're 90% of the way there.
- Aperture (f-stop): This controls how much of your image is in focus. For product shots, you want the entire garment to be tack-sharp. A great starting point is an aperture between f/8 and f/11. This gives you a deep depth of field, ensuring every detail from the front zipper to the back hem is perfectly crisp.
- ISO: Think of this as your camera's sensitivity to light. For the cleanest, most professional images, you want this number as low as it can go—usually ISO 100 or 200. Pushing it higher introduces digital noise (or "grain"), which cheapens the look and obscures fine fabric details.
- Shutter Speed: This is simply how long your camera's sensor is exposed to light. Since you'll be using a tripod (this is absolutely non-negotiable for sharp product photos), you don't have to worry about camera shake. You can start around 1/60th of a second and adjust it up or down to get the perfect brightness based on your light source.
Pro Tip: Always shoot in Manual (M) mode. It gives you total control over the exposure triangle, guaranteeing every single photo in your catalog has the exact same brightness and clarity. Consistency is everything in e-commerce.
Shaping Light for Perfect Apparel Photos
Lighting is what gives your apparel its shape, defines its texture, and makes colors pop. You have two main routes to go: the soft, accessible glow of natural light, or the controlled precision of artificial studio lighting.
Using Natural Light
If you're on a budget or just starting out, a large window is your best friend. The soft, diffused light it provides is incredibly flattering for all kinds of clothing.
- Set up next to a large, north-facing window if you can. It provides beautiful, consistent light without the harsh, direct sun that creates ugly shadows.
- Grab a simple white reflector (even a piece of foam board works) and place it on the side opposite the window. This will bounce light back onto the garment, filling in any dark areas and giving you a clean, even look.
Using Artificial Light (Strobes)
For ultimate control and consistency, studio strobes are the gold standard. You can replicate the exact same lighting conditions day or night, which is a lifesaver when you're shooting a large catalog and need every product to look uniform.
Here are a few simple but powerful setups to get you started.
Basic Lighting Diagrams for Studio Setups
| Setup Type | Description | Best For |
|---|---|---|
| One-Light Setup | Place a single light with a large softbox at a 45-degree angle to the product. Use a reflector on the opposite side to soften shadows. | A simple, budget-friendly starting point that creates clean, professional images with gentle dimension. |
| Two-Light Setup | Use a main "key light" at a 45-degree angle and a second "fill light" at a lower power on the opposite side to reduce shadow contrast. | The industry standard for e-commerce. It provides even illumination that showcases the full garment without harsh shadows. |
| Three-Light Setup | Add a third light behind the product, often called a "rim light" or "hair light." This light separates the subject from the background. | Creating a high-end, polished look, especially for on-model shots where you want to add depth and a professional sheen. |
No matter which setup you choose, the goal is always the same: create soft, diffused light that wraps around the garment. This is how you highlight the fabric's true texture and drape without creating distracting hot spots or unflattering shadows.
From Garment to Story: Styling and Capturing the Perfect Shot
Once your camera and lights are dialed in, the real artistry begins. This is the moment you stop just documenting a piece of clothing and start selling it. It’s where you bring the fabric, fit, and feel to life.
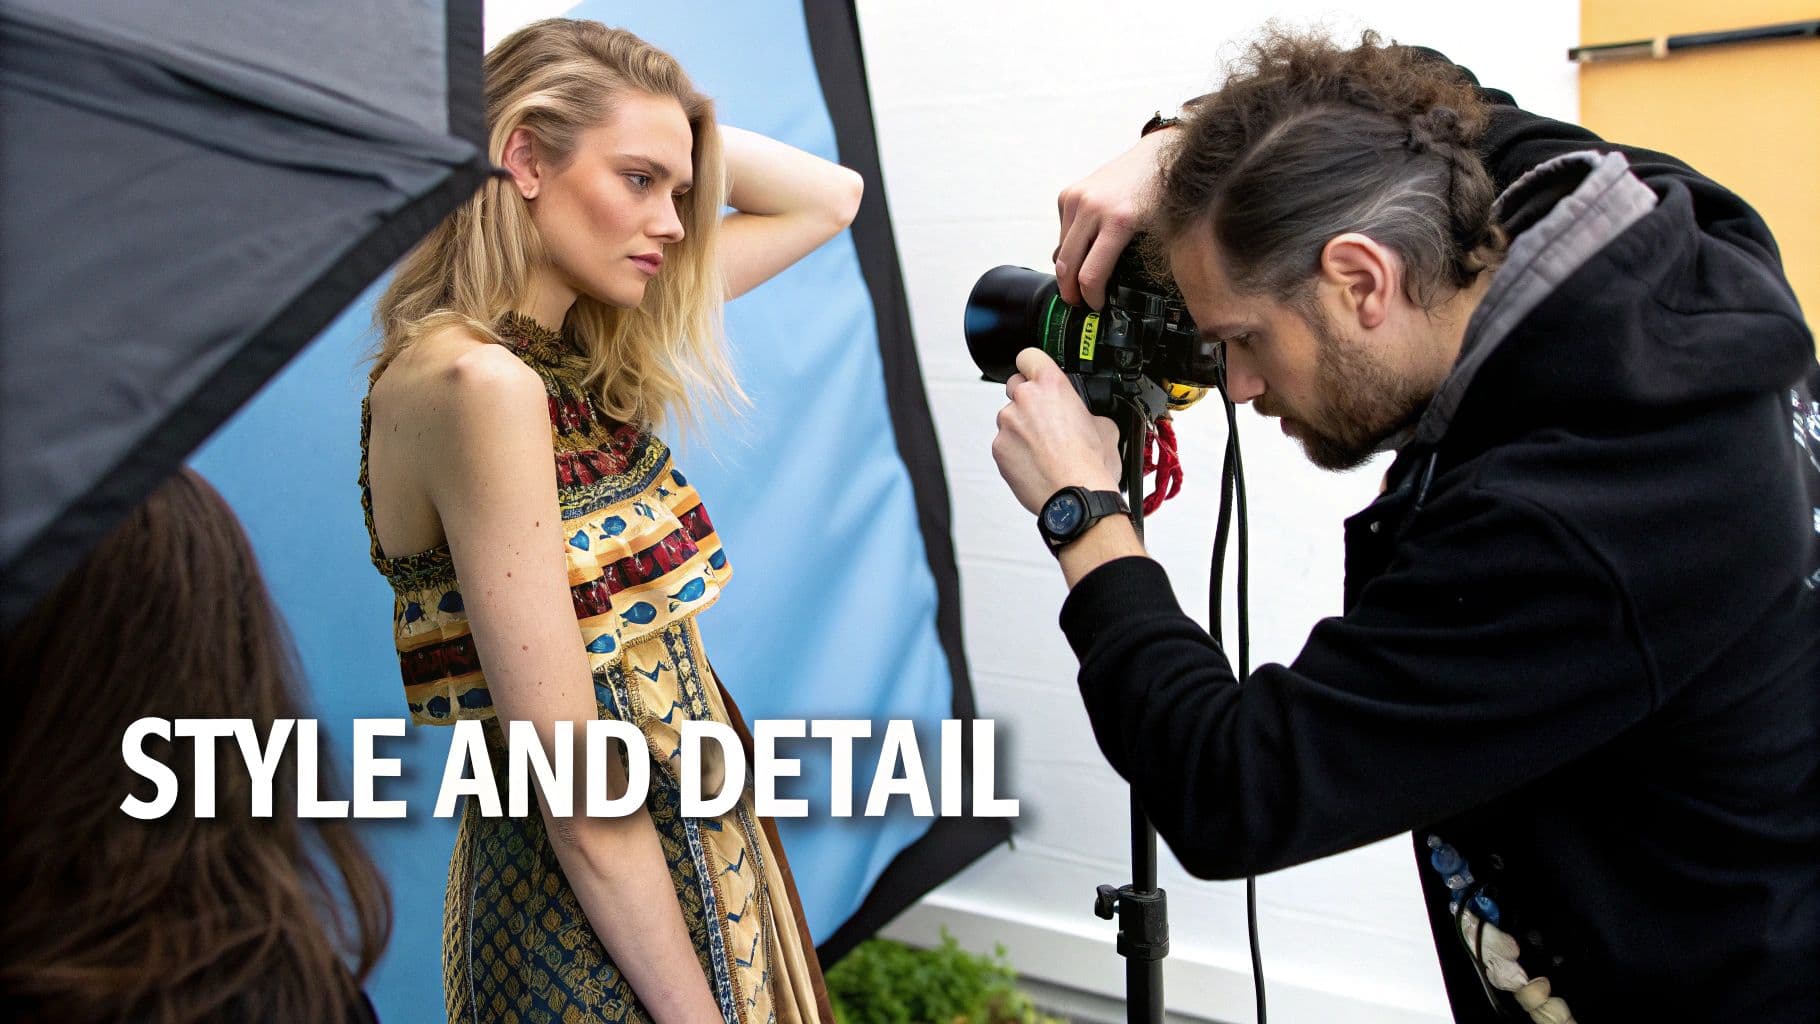
A photographer captures a stylish blonde model wearing a detailed, colorful dress during a photoshoot.
Whether you’re meticulously arranging a flat lay or directing a live model, the goal is always the same: make the product look so good your ideal customer can’t resist.
Perfecting the Flat Lay Composition
Flat lay photography needs to feel organized but never stiff. A common mistake is to press a shirt perfectly flat, which completely drains it of life. It looks unnatural.
Instead, think about creating subtle, natural-looking folds. For a simple t-shirt, a gentle fold near the hem or a slight scrunch in the sleeves can imply softness and movement. It's a small detail, but it adds dimension and helps customers imagine how the fabric actually feels.
Props play a huge role in telling that story. To really get a handle on how different items can shape the narrative of your shot, check out this practical guide to props for photography studio.
Breathing Life into Hanger and Mannequin Shots
Hanger shots are a workhorse for catalog imagery, but they can easily look boring and two-dimensional. The trick is to give the garment some shape. Lightly stuffing the shoulders and torso with tissue paper fills it out, giving a much better sense of how it sits on an actual person.
If you're aiming for a more polished, high-end look, the "ghost mannequin" technique is the way to go. You shoot the item on a mannequin and then composite multiple shots in post-production to remove the mannequin itself. The result is a clean, 3D image that showcases the garment's structure and fit from the inside out. We have a complete ghost mannequin photography guide that walks you through every step.
Directing On-Model Poses That Sell
Working with a model is about co-creating a vibe. Your job is to direct poses that not only flatter the model but, more importantly, highlight the best features of the apparel. You're selling a feeling, not just a product.
- Flowy dresses or skirts? Ask the model to walk slowly or give a gentle spin. You want to capture the fabric in motion.
- Structured blazers? Poses with hands in pockets or arms crossed can emphasize sharp tailoring and clean lines.
- Activewear? It has to look like it performs. Dynamic poses like lunges, stretches, or a light jog are essential to show off flexibility and fit during movement.
Always use clear, action-oriented language. "Look happy" is vague. "Laugh like you just heard a great joke" gets a genuine reaction. It's the difference between a posed snapshot and an authentic, engaging photograph.
Crucial Insight: Consistency is the cornerstone of a professional-looking store. While your styles and poses will change, your lighting, background, and editing style should be uniform across your entire catalog. This cohesion signals quality and builds shopper confidence.
The Importance of Detail Shots
Never, ever skip the close-ups. Detail shots are your opportunity to replicate the in-store experience of a customer reaching out to feel the fabric or inspect the stitching. They are absolutely critical for building trust and justifying your price point.
Zero in on what makes your product special.
- Fabric Texture: Use a macro lens or just get close to show the weave of denim, the fluff of cashmere, or the sheen of silk.
- Stitching Quality: Highlight the clean, even stitching on seams and hems. This screams quality construction.
- Hardware and Trim: Show off the custom buttons, branded zippers, or delicate lace. These are the premium touches people pay for.
Top e-commerce brands have this down to a science. In fact, product photography statistics show that around 76.1% of leading fashion brands use at least two different photography styles for their products, and 51.6% apply multiple styles across all their listings to give customers the complete picture.
Streamlining Post-Production with AI Workflows
The photoshoot is finally wrapped. You’ve got the shots. But let’s be honest—the work is far from over. Post-production is where good photos become great, transforming raw captures into crisp, color-accurate assets that actually drive sales.
This used to be a long, painstaking process. Hours spent in Photoshop, endless back-and-forth on edits... but that's changing fast. The global e-commerce product photography market hit around USD 163.91 million in 2023 for a reason: high-quality visuals are non-negotiable for online brands. The pressure to produce more content, faster, has paved the way for a smarter workflow.
The Fundamentals of Post-Production
Before we jump into the game-changing tech, you have to nail the basics. These are the foundational edits that build trust with your customers and make your apparel look its absolute best.
- Color Correction: This is probably the single most critical step. You need the color on-screen to be an exact match for the product in hand. I always start by using my editing software’s color calibration tools to get the white balance right, then fine-tune the hue and saturation until it’s perfect.
- Background Removal and Cleanup: For a professional, consistent look across your site, you need a clean background—usually pure white or a light gray. This means carefully isolating the product, but also zapping away any dust spots or smudges the camera picked up on the backdrop.
- Retouching Minor Flaws: Even with the best styling, the camera sees everything. A stray thread, a tiny wrinkle the steamer missed, a bit of lint. Meticulous retouching is about erasing these small distractions so the customer sees a flawless garment.
The Leap to AI-Powered Imagery
Getting those fundamentals right perfects the photos you took. But what if you could skip most of the photoshoot entirely? AI-powered platforms are completely redefining the content pipeline, letting you generate entirely new on-model shots from a single product photo.
Think about that. You take one good flat-lay photo of a t-shirt or a hanger shot of a dress. You upload it to a platform like WearView. Seconds later, you have a whole gallery of photorealistic images showing that exact item on a professional model.
This isn't just an edit; it's a total workflow transformation. It sidesteps the cost, time, and logistical headaches of booking models, studios, and photographers.
Here's a quick look at how you can generate a diverse set of on-brand model images in just a few clicks.
The process is simple: select your garment, choose from a range of AI-generated models, and instantly create assets ready for your website, social media, or ads. No casting calls, no studio fees, no marathon editing sessions.
Building a Scalable and Cost-Effective Content Pipeline
The real magic of integrating AI is scalability. It allows you to expand your apparel product photography operations without your costs spiraling out of control.
Imagine launching a new 50-piece collection. A traditional photoshoot would mean weeks of planning, multiple shoot days, and a budget in the thousands. With an AI workflow, you could generate hundreds of unique on-model images for that same collection in a single afternoon.
This kind of speed gets your products to market faster, lets you jump on trends while they're still hot, and allows you to test creative concepts without a huge financial gamble. It also solves one of the biggest challenges for growing brands: finding diverse and consistent models.
Here are a few of the key benefits we're seeing with an AI-driven workflow:
- Consistent AI Models: You can generate models that perfectly match your brand’s aesthetic and use them across your entire catalog. This creates a cohesive, professional look that used to be incredibly expensive to achieve.
- On-Demand Diversity: Need to show your product on models with different ethnicities, ages, or body types? You can create that imagery instantly, helping your brand better connect with its diverse customer base.
- Massive Cost Reduction: This is the big one. Some reports show brands are cutting their content production costs by up to 90% by swapping traditional photoshoots for AI-generated content. We break down exactly how in our guide to AI product photography.
Of course, whether your images are shot in a studio or generated by AI, they all need to be optimized for the web. A beautiful, high-res photo that takes ten seconds to load will kill your conversion rate. This is where a complete guide to image optimization for web becomes essential reading. It’s the final step to ensure all your hard work translates into a great user experience and fast-loading product pages.
Your Apparel Product Photography Questions Answered
Even with the best game plan, you're going to hit a few snags. It happens to everyone. Let's tackle some of the most common questions that pop up once you start shooting apparel, so you can solve them quickly and keep moving.
What's the Best Background for Clothing Photography?
For your main e-commerce product shots, the answer is almost always a pure white or light gray background. It's clean, professional, and makes your product the undeniable hero of the image. More importantly, it ensures the colors of your garments look true-to-life, which is a massive factor in reducing returns.
Most of the major online marketplaces, like Amazon, actually require a pure white (#FFFFFF) background for your primary images. But that doesn't mean you can't get creative elsewhere. For your social media feeds, lookbooks, or email campaigns, feel free to use textured, colored, or even real-world backgrounds. These shots build brand personality and show your product in a lifestyle context.
The real key here is consistency. Whatever you choose for your main product listings, stick with it across your entire catalog. For your creative shots, just make sure the background complements the garment instead of fighting it for attention.
How Can I Actually Reduce the Cost of Apparel Photography?
This is the big one for most brands. The good news is, you have options that don't involve sacrificing quality.
First off, think about bringing a basic setup in-house. A one-time investment in some decent lights and a backdrop can save you a fortune in the long run by cutting out recurring studio and photographer fees. It pays for itself faster than you'd think.
Another huge efficiency hack is to batch your shoots. Don't just photograph one or two items. Get organized, prep dozens of products, and shoot them all in a single, focused session. This maximizes your time and your setup, bringing the cost-per-image way down.
But the most dramatic cost-saver available right now is using AI photography. Platforms like ours let you take one simple photo—even a flat lay on your floor—and instantly generate hundreds of photorealistic on-model images. This completely removes the need to hire models, book studios, rent gear, or pay for hours of retouching, often slashing photoshoot costs by 80-90%.
What Are the Go-To Image Specs for E-commerce Websites?
While every platform has its quirks, there are some solid rules of thumb that work almost everywhere. Nailing these specs is critical for how your store looks and performs.
- File Type: Stick with JPEGs. They offer the best compromise between image quality and file size, which is crucial for page speed.
- Color Profile: Use sRGB. It's the web standard and ensures your colors look the same on your customer's screen as they do on yours.
- Dimensions: Go big. Aim for at least 2000 pixels on the longest side. This gives you a crisp, high-quality zoom feature, letting shoppers inspect the fabric and stitching up close.
- File Size: Keep it under 500KB. Anything bigger will start to slow down your page load times, which is bad for the user experience and your SEO.
Most modern e-commerce platforms like Shopify are smart enough to automatically create smaller versions of your images for thumbnails. That's why you should always upload the highest-quality file you have and let the platform do the work.
How Do I Keep My Lighting and Color Consistent Across All My Photos?
Consistency is what separates the pros from the amateurs. It’s what makes a brand feel cohesive and trustworthy. Getting it right starts with your camera.
Before you snap a single picture, set a custom white balance. The easiest way is to use a simple gray card. Just take a photo of the card in your lighting setup, and then tell your camera, "This is what neutral gray looks like." Your camera will then adjust all the colors to be accurate.
From there, lock everything down. Use the exact same lighting setup, camera settings (aperture, ISO, shutter speed), and lens for every single product in a collection. Write these settings down in a notebook or a doc so you can replicate them perfectly six months from now.
Finally, your post-production workflow is your secret weapon. In a program like Adobe Lightroom or Photoshop, edit your first photo to perfection. Then, save those adjustments as a preset and apply it to every other photo from that shoot. This guarantees every image has the same brightness, contrast, and color tone.
Ready to create stunning, studio-quality visuals without the cost and complexity of traditional photoshoots? WearView uses AI to transform your simple garment photos into thousands of on-model images instantly. Generate your first images for free.

WearView Team
WearView Content & Research Team
WearView Team is a group of fashion technology specialists focused on AI fashion models, virtual try-on, and AI product photography for e-commerce brands. We publish in-depth guides, case studies, and practical insights to help fashion businesses improve conversion rates and scale faster using AI.